- ITソリューショントップ
-
製品・ソリューション
-
ダイキンのIT
 製造業向けITソリューション
 品質DX支援 QX digital solution
 建設業務改善ソリューション
 ビル管理業務支援 DK-CONNECT BM
 FILDER SiX TOP
 FILDER SiX 電気 TOP
 Rebro D TOP
 実験記録をデータベース化 ParsleyLab
 マテリアルサイエンス向けソフト Materials Studio
 熱力学物性予測ソフトウェア COSMO
 電子実験ノート
 総合3DCG 制作ソフトウェア Maya
 総合3DCG 制作ソフトウェア 3ds Max
 3Dキャラクタアニメーション制作ソフトウェア MotionBuilder
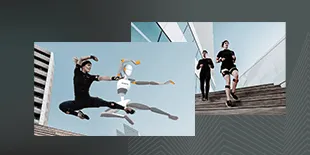 モーションキャプチャーシステム Xsens MVN
|
プロローグ ;Prologue
|
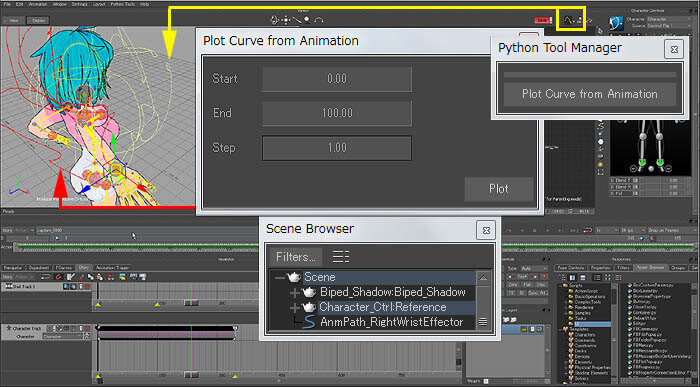
| ツール;xsiaddon 最初にプラグインツールですが、紹介記事のあった si-community から入手してください。 また、ツールの更新、仕様変更もあるかも知れませんので、御了承ください。 現時点での各ツールのバージョンはMotionTrail v1.3 、Animation Manipulator V1.0 です。 MotionTrail http://www.si-community.com/community/viewtopic.php?f=9&t=2774 Animation Manipulator http://www.si-community.com/community/viewtopic.php?f=9&t=2731 Get those tools from where it was introduced, inside si-community . Tools , may update or change features. Now , the versions are MotionTrail v1.3 、Animation Manipulator V1.0 もし古いバージョンをインストールしたことがある場合、アンインストールした後、 ファイル > 設定 > Custom内にあるMotionTrailというノードを削除しておくことをお勧めします。 If you have installed older Version ,after uninstalled , delete MotionTrail node inside Flie > Preference > Custom . |
| 設定;Install ツール内のReadMeにも書かれている通り、32bit か 64bit の addon をインストールします。 ここでは Workgroup として64Bit版をインストールする方法を紹介しておきます。 ファイル > プラグインマネージャーでインストール先のワークグループが一番上にあることを確認し、 ツリータブ内でそのワークグループを選択して右マウスクリック > .xsiaddonのインストールを選択します。 各ツールのアドオンを選択してインストールします。 (このアドオンディレクトりーはSoftimage2013SP1 も参照していて、起動時に自動的にインストールされます) As is explained in the readme file inside the tool , install the 32bit or 64bit addon file. Here I will show how 64bit addon is installed in a workgroup . Get the File > Plug-inManager... , and check the installing workgroup is at the top of the list in Workgroup Tab , then in the Tree Tab , select the workgroup > RMB > Install .xsiaddon . 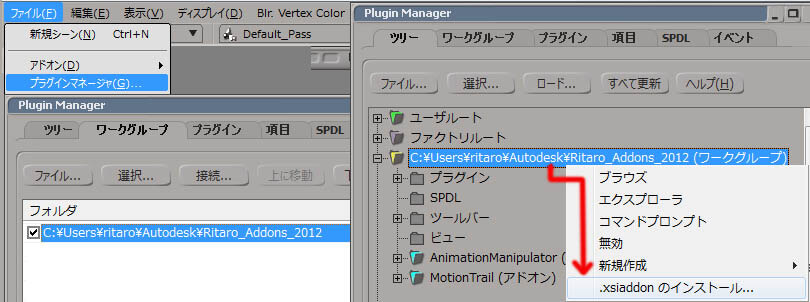 確認は、表示 > ツールバーのカスタマイズで表示される画面で 左側グループ欄でCustomScriptCommandsを選択し、右側で各ツールの名前のコマンドが登録されています。 This will set a custom command . To check this command , do View > Customize Toolbars... , you will see Animation Manipulator and MotionTrail in Custom Script Commands Group . 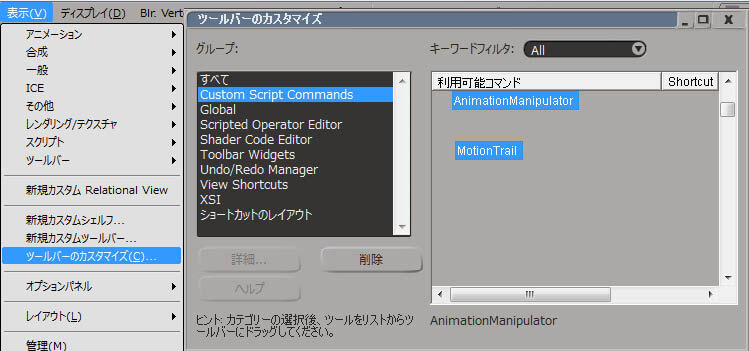 どこかのキーに設定することも、ボタンにしておくことも出来ます。ここでは後者にしておきます。 ScriptEditor にてMotionTrail と記述してアニメーションの付いたオブジェクトを選択して、実行してみます。 OKならMotionTrail を表示 > 既存のツールバーか>新規カスタムツールバー上にドラッグ&ドロップします。 スクリプトボタンを作成し、ボタンのラベル名や大きさを設定して[ OK ] を押します。 Use these commands to get the tool working . You can set these commands to Key Button or toolbar Button. Here will show as a Toolbar. At ScriptEditor run MotionTrail , after selecting key animated object , to test if it works . If it is OK , select the word MotionTrail , and Drag&Drop to a already existing Toolbar , or on a new one . At popup , chose Script Button , rename the Button Label , change the Width and do [ OK ] . Same to AnimationManipulator . 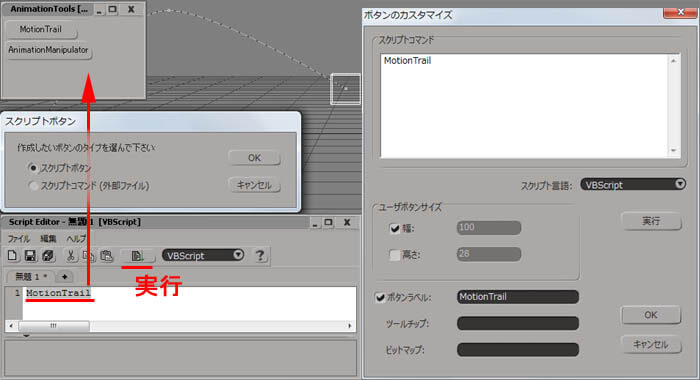 This toolbar can also be saved in a workgroup . 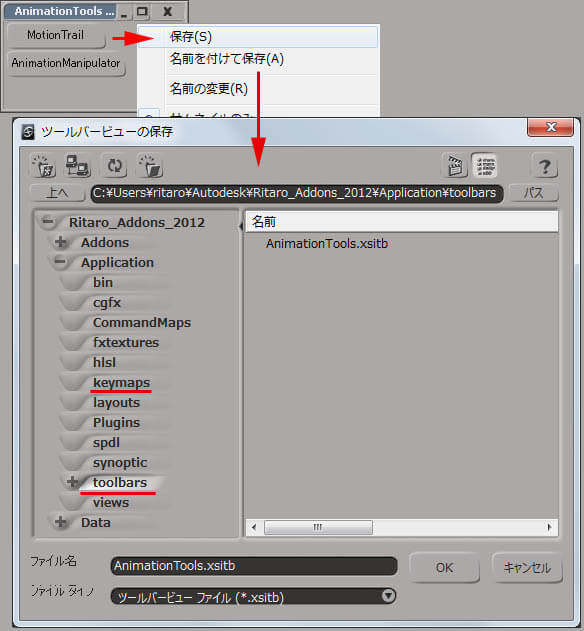 このツールのキー割り当てで、昔からのSofitmageユーザーは回転キーとして使うOキーが使われていてうまく使えない あるいは、MayaやMaxキー割り当てを使っていて他のキーに設定したい場合、変更することができます。 ファイル > キーボードマッピングで設定画面が出ます。デフォルトのものを変更しようとすると警告が表示されるので、はいでカスタムなものを作成します。 If your an old Softmage user , perhaps O key is using for Orbit , and MotionTrail tool in using O Key for "Break Key ". Also Maya or Max user want other Key to use . For this , you can change using custom keymap. From File > Keyboard mapping... , default Keymap setting will appear . If you try to edit this , a warning will popup to make a custom one , so do so [YES] . 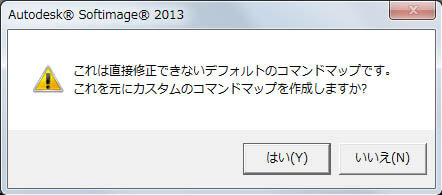 好きなキーに割り当てても良いです。
任意の名前でキー登録したファイルもワークグループ内のKeymapsディレクトリーに保存すれば同じくワークグループ設定になります。(ディレクトリーは自分で作成します)This custom keymap can also be saved in the workgroup with unique file name . 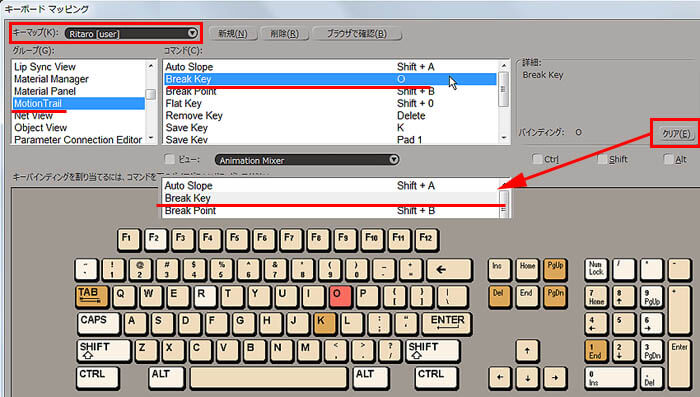 |
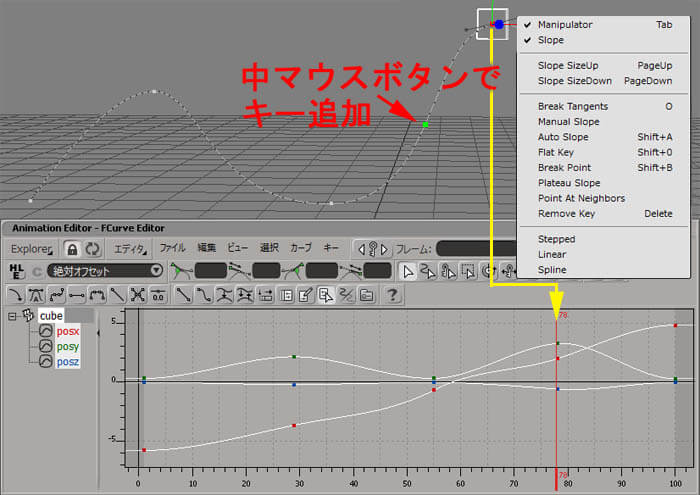
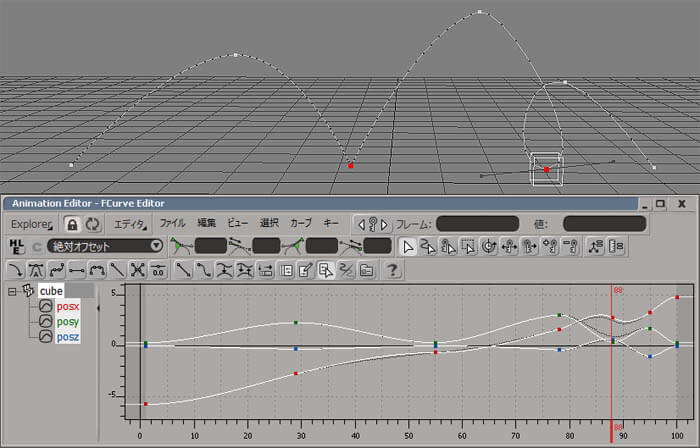
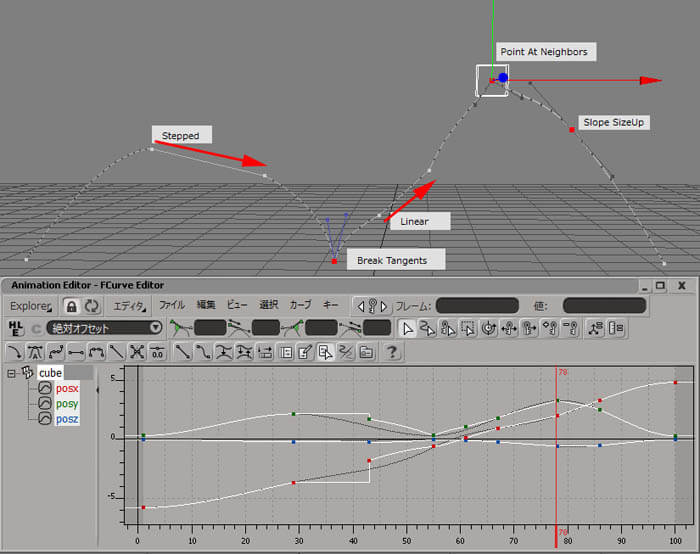
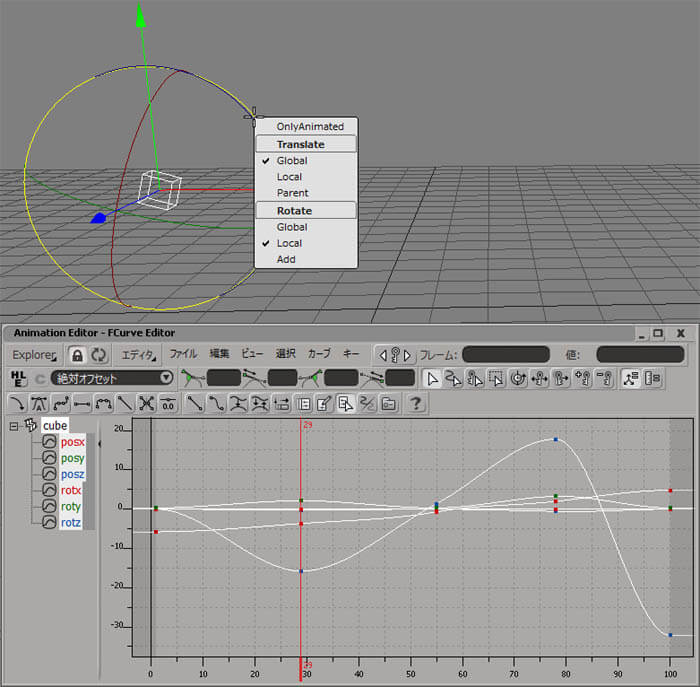
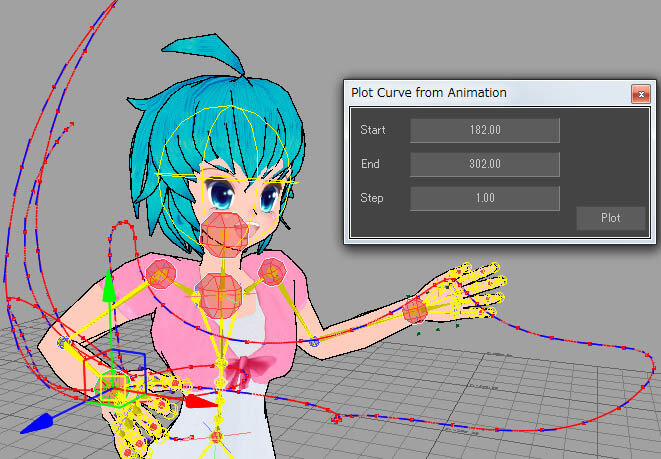
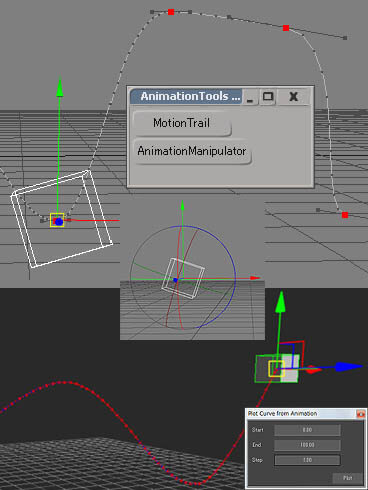
| データ修正;Fixing Animation 動きの修正をMotionTrail を使って行ってみます。 まず、全フレームたどキー操作が困難なので、ある程度キーを減らします。XYZ軸ともキーがある状態です。 全部のフレーム分のMotionTrailカーブ を表示するのは処理が重くなるし、カーブがたくさんあると分り辛いので、 修正が必要なフレーム数を絞り込みます。 左右タイムラインの範囲を指定します。 下図は修正がかなりされている状態で、手の動作の反復運動が体の裏側に行っても継続され、 尚且つ体の回りを手が円を描いて回るようになっています。 Fixing Character animation using MotionTrail . For more better handling , used filter to reduce keys . Each frame has XYZ keys . Also limit the frames to show in timeline . Below , has already fixed the hand animation , which moves it's hand Up and down around the body . 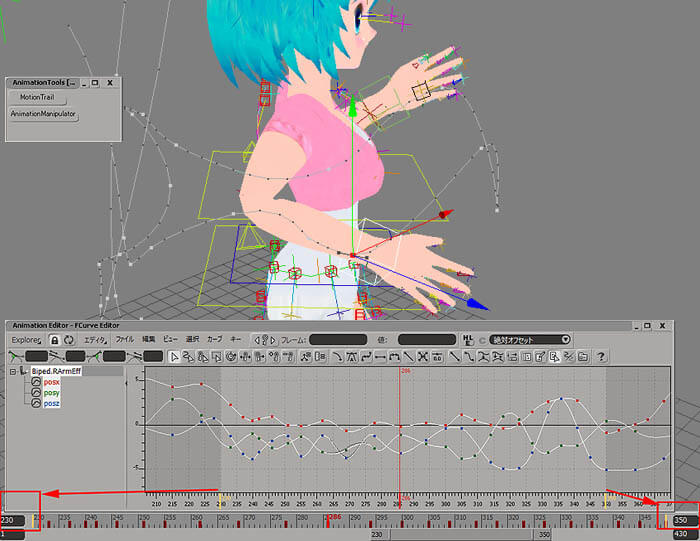 MotionTrail上のキー部分を赤色選択して スロープを変更するだけで動きを修正できます。 You can fix funny sharp and loop animation , just by moving MotionTrail's slope handles . 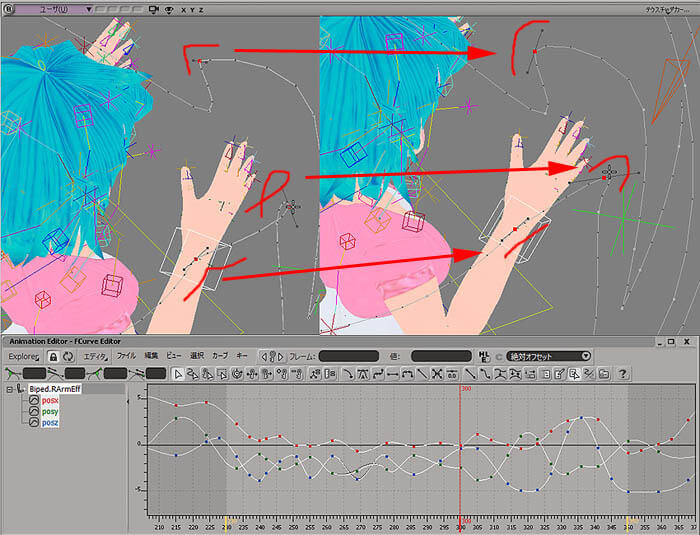 ぴったりあわせることができました。これはもう別のモーションになってしまいますね。 他にはUpVectorの位置の編集にも使えました。 うまくコントロールできない時はAnimationEditorと併用して位置調整することをお勧めします。 The raised hands position and animation are different right to left ,
then just move MotionTrail's position . Also used in fixing UpVector position. If you have difficulty placing the MotionTrail's position , use AnimationEditor too. 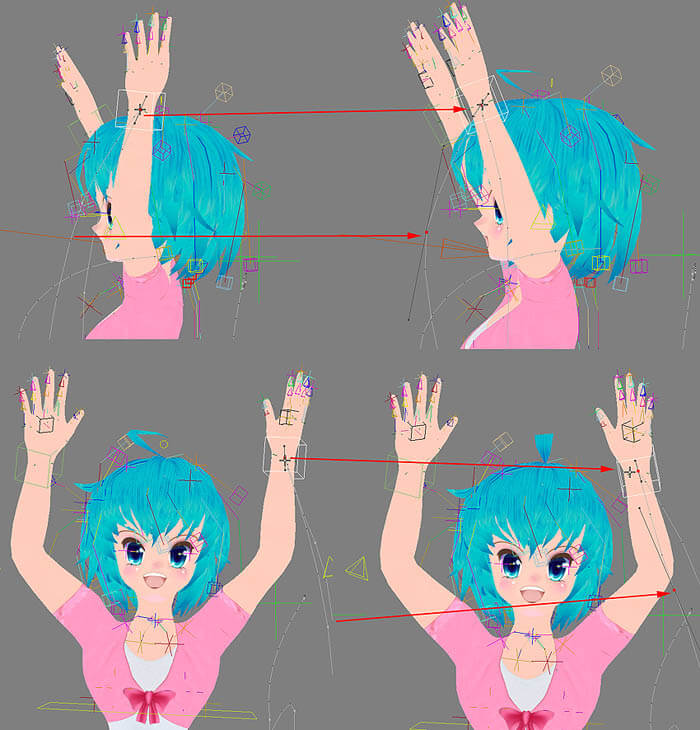 |
| 結果;Result 大成功のようです。全フレームのアニメーションの修正例ではなく、 キー間のあるアニメーションの修正ならとても便利なツールです。 ばんざーい!! The result was fine , can fix any Keyframed Animation..I think.. BANZAI !! 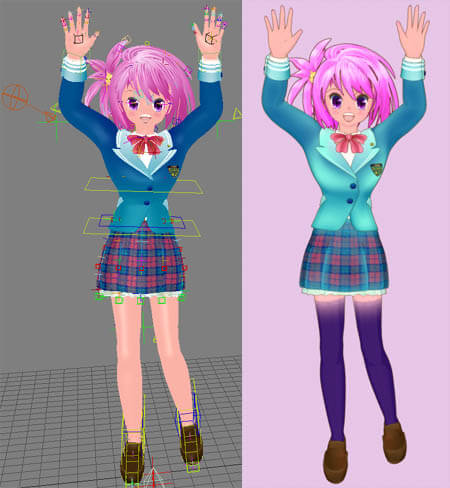 |
| という訳で、次回 は・・・・ MotionBuilder その2に戻れるのか?? 乞う、ご期待!!
|