- ITソリューショントップ
-
製品・ソリューション
-
ダイキンのIT
 製造業向けITソリューション
 品質DX支援 QX digital solution
 建設業務改善ソリューション
 ビル管理業務支援 DK-CONNECT BM
 FILDER SiX TOP
 FILDER SiX 電気 TOP
 Rebro D TOP
 実験記録をデータベース化 ParsleyLab
 マテリアルサイエンス向けソフト Materials Studio
 熱力学物性予測ソフトウェア COSMO
 電子実験ノート
 総合3DCG 制作ソフトウェア Maya
 総合3DCG 制作ソフトウェア 3ds Max
 3Dキャラクタアニメーション制作ソフトウェア MotionBuilder
 モーションキャプチャーシステム Xsens MVN
|
プロローグ;Prologue
|
| HUD を利用したアニメーション確認;Using HUD 作業途中でアニメーションの一連の動きを確認する為にムービー化すると思いますが、 その際に、HUD(= Heads Up Display 画面に色々な情報を表示) を使ってムービー化するとデータとして見やすい映像になります。 また、一度作成したHUD設定は1つのファイルとして保存しておけば、 どのシーン上にも追加読み込みすることで、何度でも使用することができます。 HUD 用のシーンデータとは、具体的にはカメラにHUDが設定され、 そのHUDには画像や数値を表示するようになっているfbxになります。 まずは Asset Browser > Elements の中から Camera をシーンにドラッグ&ドロップします。ここではZ軸方向を見ているようにしておきます。 Cameraの設定は Navigator画面にてムービーの画像サイズなど決めておきます。 When you check your Animation , HUD is very useful. In MotionBuilder , you can save your custom HUD as a scene file , so you can use it again . HUD is a settings in Camera , which shows texts and pictures. To make one , get a Camera from Asset Browser > Elements , that is looking Z Axis . Set Picture Format and Resolution in Navigator Tab. 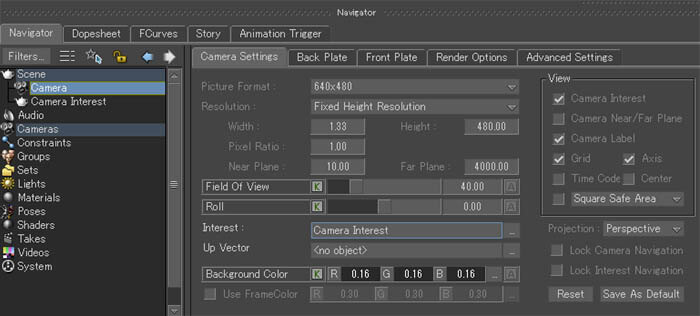 Next , Drag&Drop HUD in AssetBrowser to View and chose [Add to Current Camera]  [ NEW ] を押すと表示する種類を選択できる画面が表示されるので、例えばEditFrame を選択して[ Create ] ボタンを押します。 すると、カメラ画面の左下に現在のフレーム数が表示されます。 Double-click HUD in Navigator and click [New...] to set what type to show . For example , choose [EditFrame] to show up current frame number . 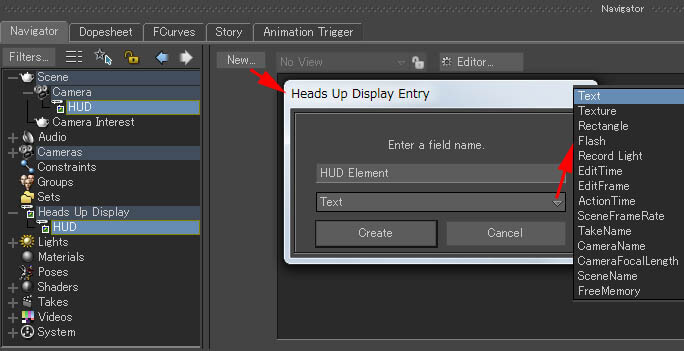 テキストを表示したり、シーン名、時間、フレーム数。画像、と色や大きさを組み合わせて下図のような表示画面を構築できます。 HUD以下の各機能が分るように名前も変更しておきます。 これをシーンファイルとして保存しておきます。 Click [New...] to set more to show , [Text] , [Scene Name], [Time], [Frame] , [Picture], Change Color and Size . When adding nodes under HUD , change node name to recognize what it is . Save this scene as a FBX file .  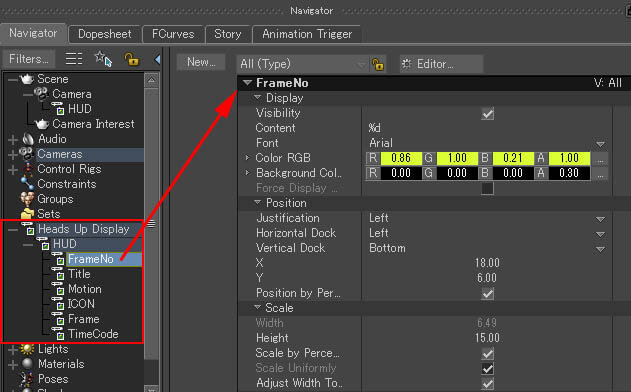 When editing motion , load this HUD scene file to show information .  File > Render から各設定でAVIファイルなどに書き出します。
You can render to AVI file with this HUD , from File > Render . 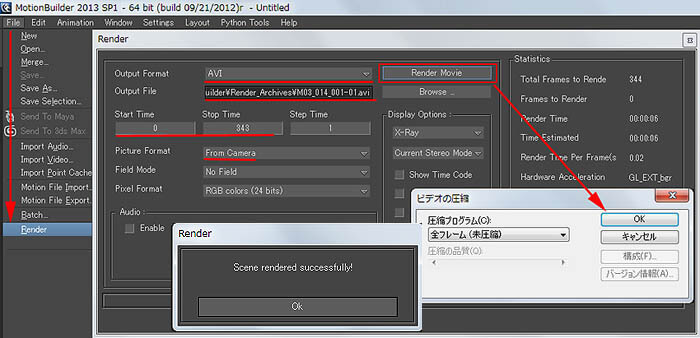 |
| Actor と ControlRig 対応;Setup ControlRig to Actor
さて、まず始めに Actor の動きを ControlRig 独自の動きに持ってきます。
で、その時にTポーズから手を下げた時、肩が落ちすぎることがあり、まずはその対応が最初の一歩です。 First thing to do is putting Actor's movement to ControlRig . But before that , you have to set your ControlRig TPose to fit with Actor . When Actor's Hands are down , the Shoulder is likely get too low. 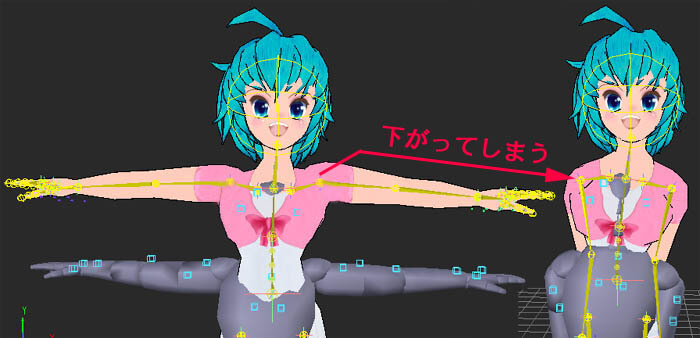 左のNavigator でCharacter のCharacterize と、InputType の Active の両方のチェックを外します。
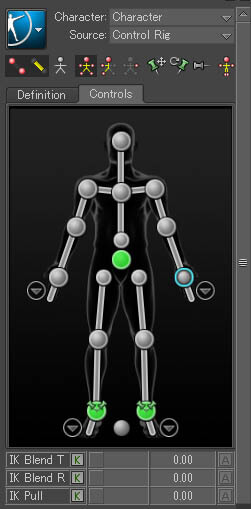
キャラクター本来のスケルトンの肩の骨を少し上に回転しておきます。 そうしたら、もう一度Characterizeを有効 に戻して、Biped の ControlRig を作り直します。 InputType を Actor にして動かして肩が変に下がらなくなったら成功です。 To Fix this , put the Check Off both Characterize and InputType Active in Navigator, rotate your original character skeleton's Shoulder a bit high , then Check On Active again . Put InputType of the ControlRig to Actor , and see the Shoulder's behavior . 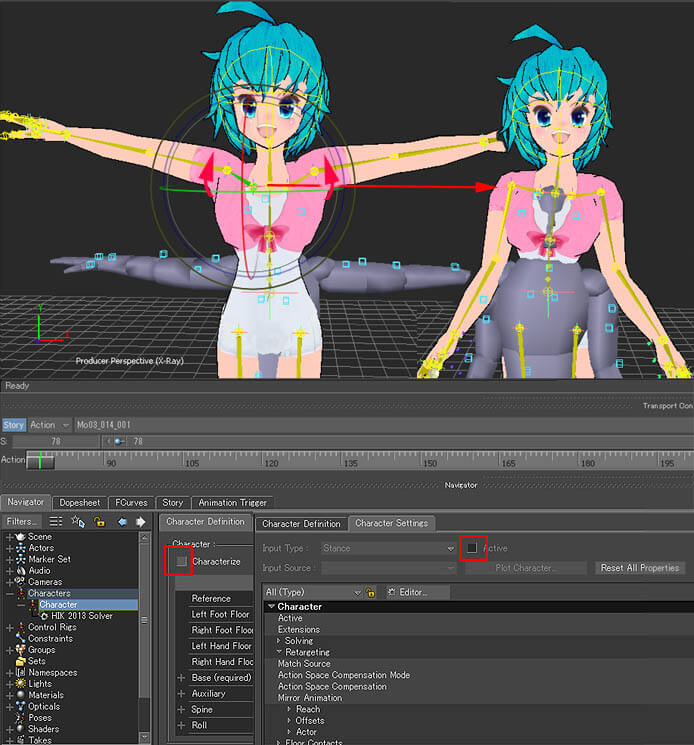 それでも更に回転して肩が下がってしまう場合に、回転値の制限を設定することも出来ます。
設定する所が少し奥にあるので追ってみてください。 まず、ControlRig の肩の骨を選択した状態で、Properties タブ画面で、一番上のTypeをAllにしないと項目が表示されません。 そして、Degree of Freedom(DOFと良く略す) > Rotation > MaxR > Enable Max Z □ にチェックをいれ、 Max Freedom z に値 (ここでは23.00)を入れます。ここの値は LCL(ローカル値)になります。 If you still can't Fix it , you can set Rotation Limit to the Shoulder . The setting menus are inside Character_Ctrl in Properties Tab , but can't see it without setting [All (Type)] at the top . In Rotation(Loc) expand Degrees of Freedom > Rotation > Max R > Enable Max Z and put in Check , then set Max Freedomz degree (Ex 23.00) . 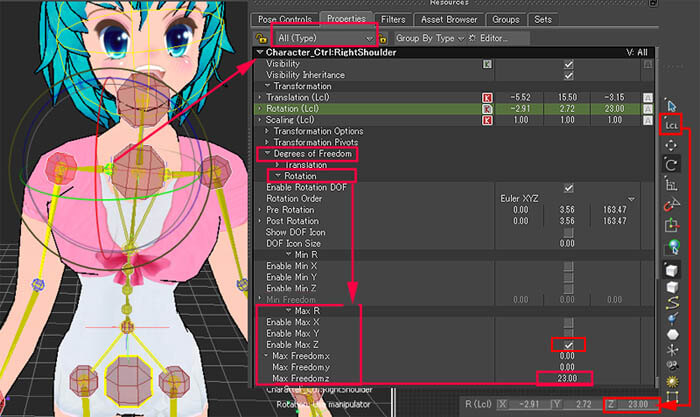 そしたら、右上の Character Controls 項目の青色アイコンから > Bake (Plot) > Bake (plot) to Control Rig を実行します。
これでControl Rigに直接アニメーションが乗った状態になり、Actor 無しで 動くようになります。 良く見ると Character Settings タブのInputType はActor からControl Rig になっているはずです。 Ready to go , choose from blue ICON > Bake(Plot) > Bake(plot) To Control Rig . Now your ControlRig will move without Actor on . Look InputType in Character Setting Tab , it's changed to ControlRig from Actor . 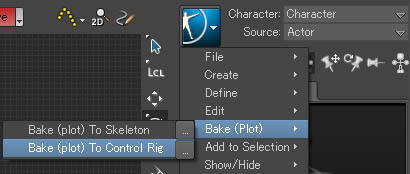 |
| Story を使ったアニメーション編集;Edit Animation using Story Control Rig に乗っているアニメーションを Story の Clip 化します。
Softimage のAnimationMixer と同じ感じで、Clip化することで、アニメーションを切ったりつないだり、伸ばしたり縮めたり、混ぜ合わせたり出来ます。 ここでは、撮ったモーションキャプチャーの動きにメリハリをつけたり、うまくつなぎなおしたりしてみます。 Story 画面下段左側に CharacterTrack を設定し、Character項目に ControlRigの名前(例;Character)を指定します。 出来たトラック上で右マウスクリック > Insert Current Take を実行します。アニメーションが Clip化 されます。 TransportControls 、つまり中央タイムラインの左上の [Story] が青くONになっていることを確認してください。 この状態でないと、Storyのアニメーションが再生されません。これ良く見落とします!!! (逆に OFF の場合、Clipでないアニメーションがあった場合、それで動作します。) Clip を選択した状態で、右マウスクリック > Razor で Clipを分割 できます。 分割したものをコピーペーストすることで何回も使ったり。重ね合わせてループを作成したりできます。 Put your ControlRig Animation to Story Clip . Story is like Softimage's Animation Mixer , you can put animations as Clips , do cut/split/scale/mix those Clips . In this example , used Story to get more aggressive movements and retiming motions . Make a CharacterTrack in Story window , set Character Name (ex; Character) from pull down menu and do RMB > Insert Current Take . This will make a Clip from ControlRig Animation . In TransportControls make sure that [Story] is On . Don't forget this On!! ( Without this [Story] On , the Plot animation on ControlRig will be moving the character .) With Clip selected , you can split Clip by RMB > Razor . Copy & Paste these Clips and Blend or Resize them to remix Animations . 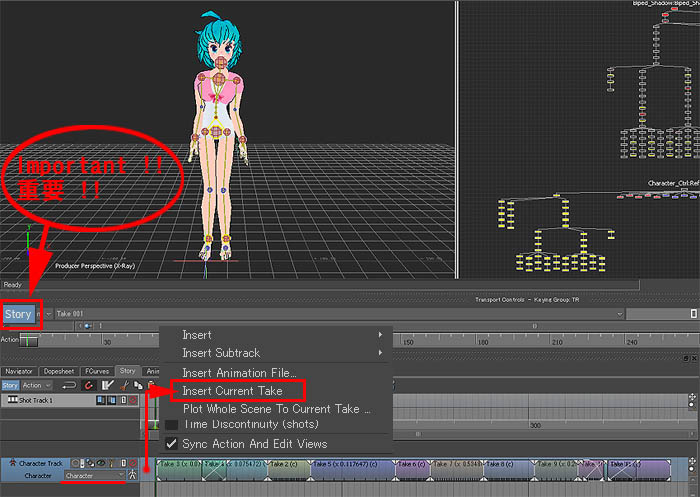 Clip 同士の重なり方も Properties タブの Fade In-Out 項目をみるとLinear 以外にも Smooth, Slow, Fast, Custom, などの種類があります。
更なる修正は後でもできますので、ここではタイミング重視で、どんな動きにしたいのかが分るようなものにします。 Blending Clips , more information is inside Properties Tab , you will find Fade In-Out Interpolation is Linear as default , pull down menu has 4 more modes , Smooth , Slow , Fast , Custom . At this point , Retiming is most important , edit Clips to make what kind of animation you want for your character . 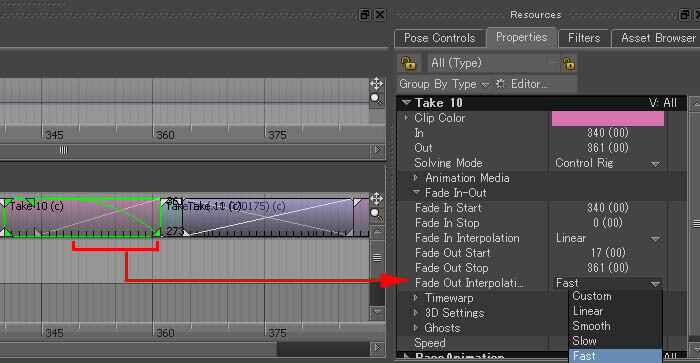 |
| Animation Layer を使ったアニメーション編集;Edit Animation using Animation Layer Story の Clip 編集でだいたいの動きの速さ、タイミングが出来たら、 再びこのClip群のアニメーションを Control Rig に戻します。 Finished editing Clips to get retimed animation , then put this Clip Animation back to ControlRig . TIPS; このControl Rig にアニメーションを戻して来る時、Take数を変えることで、元の動きを残しておいて比較しながら作業をすることも出来ます。 Take001をTake002にします。その際に表示されるポップアップの設定画面で元のTake001の情報をコピーするかっていうのでNOを選択します。 When putting back this Clip Animation to ControlRig , you can change the Take to New one . This will be good for comparing animation from the original one. Changing Take001 to Take002 , pop up menu will appear , choose [No] . 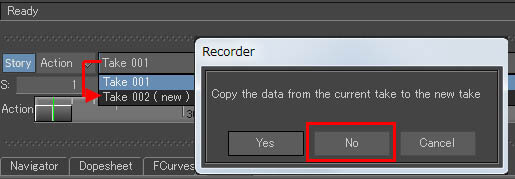 Plot の設定 はそのままに[ Plot ] します。 On CharacterTrack do RMB > Plot Whole Scene To Current Take ... , popup menu will appear , do [Plot] as default settings. 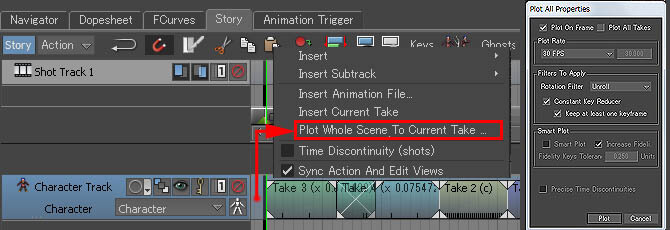 AnimationLayers項目のAnimLayer1のレイヤーにキーフレームのデータを作成します。 これは大変便利な機能で、ベースとなる動きはそのままに、追加のキーを上のレイヤーで設定できるのです。 This time , fixing the hole motion with setting animation to ControlRig , but use AnimLayer1 in Animation Layers . This is very useful feature , you can make new animation over the existing base animation. 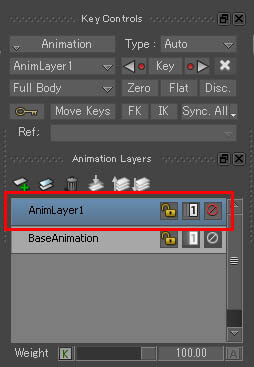 これくらいでもものすごく修正していますし、作業もとても楽に行えています。 特に、元のモーションでは首を横に向けてますが、ここでは正面を向いているように修正してます。 Don't set too much Keys on AnimLayer1 , because it will change the animation more than you expect, few keys will fix animation dramatically. 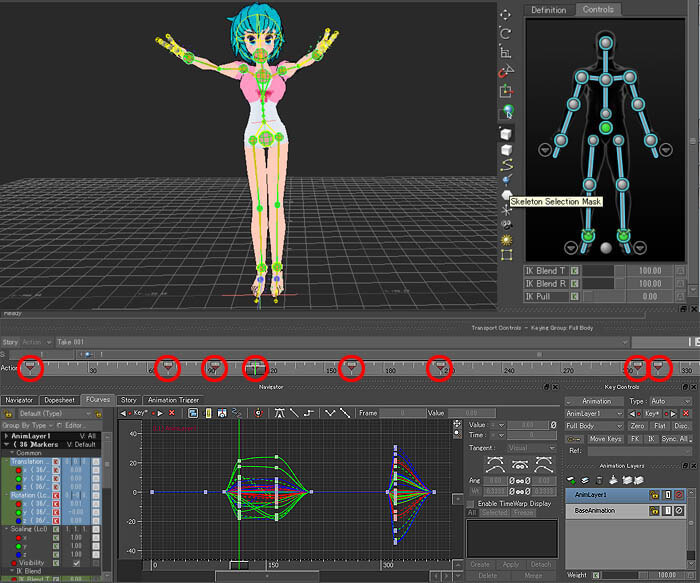 2つのレイヤーを選択状態にし、右マウスクリック > Mergeを選択し、設定はそのままにMergeを実行します。 Then you will Bake(plot) this animation to SkeletonRig , but before you have to Merge the Animation Layers to one . Select both Layers , do RMB > Merge , use default settings press [Merge] . 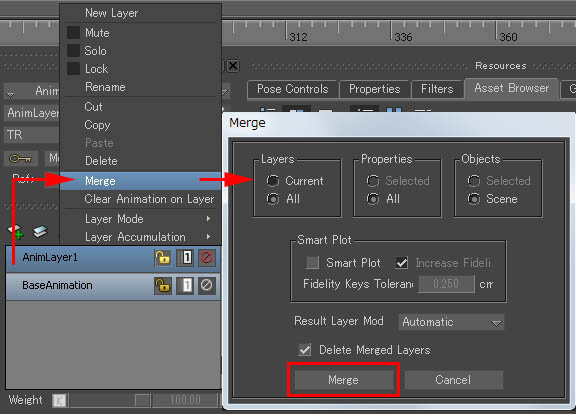 From Blue Button in CharacterControls > Bake(Plot) > Bake(plot) to Skeleton . 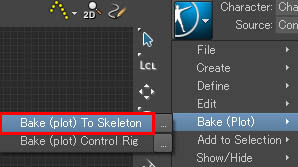 □ Characterize のチェックを外してControlRigを削除しても、ちゃんとキャラクターが動くはずです。 If it's done properly , check OFF Characterize in the Navigator Tab and delete ControlRig , the SkeletonRig will still animate as you expected . 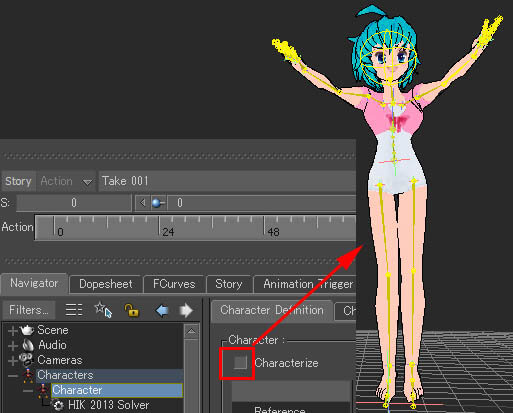 アニメーションの付いたBiped_Shadow をFBX保存します。このデータをSoftimageで読み込みます。 Select all SkeletonRig , do File > SaveSelection to save the animated Biped_Shadow to FBX file format . This data is going to be imported to Softimage . TIPS; アニメーションの最後が最初とうまくつながりループするように作ることも簡単に出来ます。 もう一度アニメーションをStoryのClip化し、そのClipの複製を1つ作って最初の部分をRazorで分割します。 その最初の部分のClipを元の後ろに少し重なりつつも、Fade In-Out をSmooth を使ってとうまく混ぜ合わせます。 更に調整が必要な時は、また Control Rig に通常のアニメーションとしてTakeに戻します。 You can make the Last part of the animation to be seamlessly loop to the first part of the animation , very easily. Once again put the animation to Clip , make copy of it , Razor cut the first part of it , and joint that to the last part using Fade In-Out with interpolation Smooth . If you need more fixes , put it back to Take as a normal animation of ControlRig. 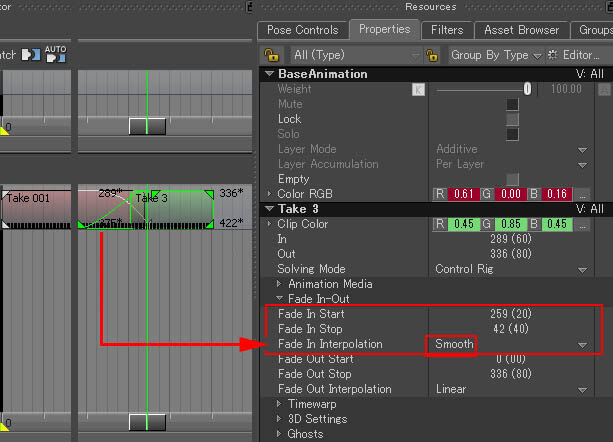 MotionBuilder の特徴です。 MotionBuilder can easily change it's animation as Take's Layer Key Animation to Story's Clip Animation , and backward . 3番目のアニメーションの状態3rd Animation |
| Softimage の IK Rig アニメーション編集 ;Editing Softimage IK Rig Animation さて、本来ならここでMotionBuilder からSoftimage にアニメーションを転送する説明部分ですが、 それはICEで組んだリターゲット設定の話で長~いので別ページ にて解説します。 Before further information , there should be in between page about Retargeting Motion using ICE but the story will be some long one , that will be on another page .  ICEを使ってMotionBuilderのFKをSoftimageのIKにリターゲットしているシーン Retargeting MotionBuilde FK to Softimage IK using ICE このリターゲットも完璧ではないので、骨の動きによっては意図しない動きになっていたり 全フレームのキーアニメーションでは滑らかさが無い動きになっていたりします。 So from here the Animation from MotionBuilder is already on Softimage IK Rig . This ICE retargeting is not a complete one , all frame keyed animation has some terribleness , sometimes act as not expected . Maybe more workflow has to be made... 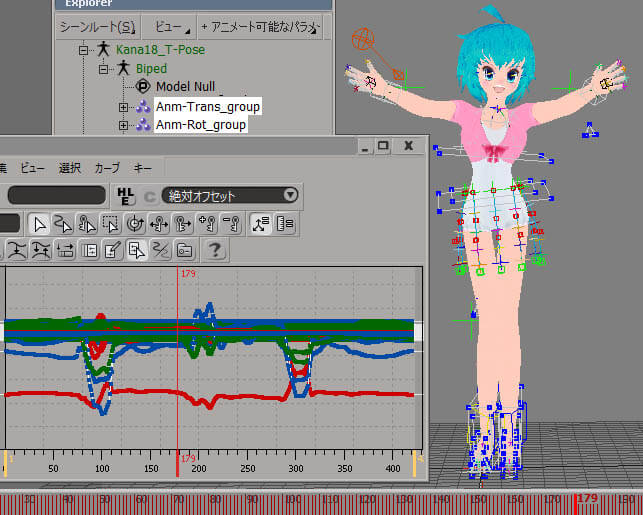 かなり減らしていますが、動きの特徴は捉えています。MotionTrailプラグインで両手の位置やタイミング調整をします。 To get more good result , reduce Keys and get smoothness in animation . Reducing keys but some characteristic must be left to the animation . MotionTrail Plugin is also useful fixing both arms to be moving in some timing and place symmetrically . 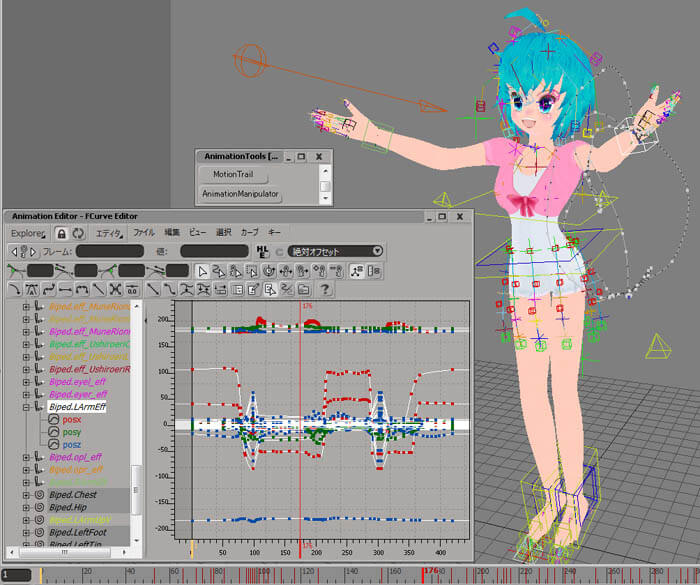 この段階でも画面上のカメラアイコン > 画面のキャプチャーでキャプチャー動画を作って細かくアニメーションを見て調整します。 本来そのアニメーション持っている特徴点や面白い動きの部分は残しておきます。具体的言えば、腰がくねっていたり、左右対称じゃない動きとか、女性らしい動き等です。 (元のモーションキャプチャーの動きにはなくてで自分で作ったものとして面白いのは、足が地面に付いた後から腰の動きが追従し、余韻が残ってからほぼ動かなくなる等々あります。.) And now fix animation on Final Character Rig Data .(Has skirt and Hair ... so on) Use View Capture to see animation more closely to fix detail movement . You have to leave the feature in the motion that make the animation characteristic , concretely speaking , is Hip moves with funny bends , not symmetrical or not straight , which might be woman's movements . (Some animation must be made , because it isn't in Original MotionData , is feet animation hitting ground is before Hip move and that Hip moving is rather long to hold on .) Softimage の画面キャプチャー機能で撮ったAVIファイルをMotionBuilderのHUD画面にD&Dして同じHUD情報の付いたムービーにすることも簡単です。(FPSは確認すること) また、このシーンを一度保存してて、キャプチャーした時のムービーファイル名を同じにしておくと、繰り返し確認が更新だけですぐ見れます。 Softimage's View Capture AVI can be put into MotionBuilder to put HUD information on it , will be very useful to analyze animation . Becarefull to use same FPS . Also , if you make this AVI filename always same one , you can refresh it tremendously quick and easy . 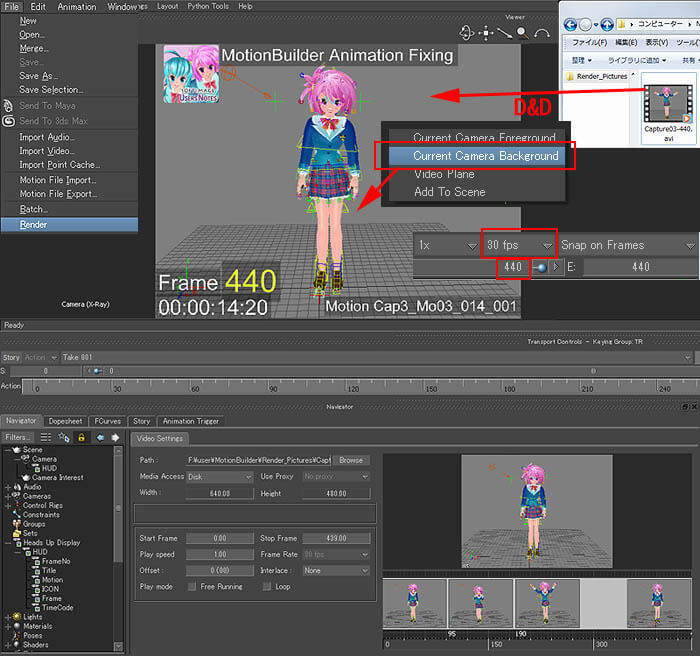 Further , do some animation on hands and fingers which isn't in Motion Capture Data . 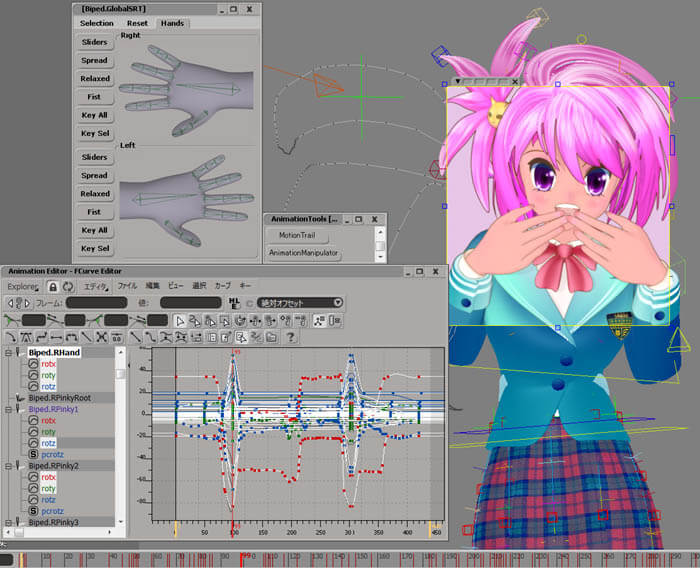 4番目のアニメーションの状態4th Animation
|
| 表情とカメラパスアニメーションの追加;Adding Facial and Camera Pass Animation お次は、スカートや髪の毛といったユレモノの動き乗せていきます。(細かい所では、胸のリボン、後ろの襟、そして胸など) 時間があれば ICE で作ったシミュレーションの動きを乗せたいところですが、今回はキーフレームで用意しました。 Next is Swinging (?) Parts like Skirt and Hair . (More is chest ribbon , neck back collar , and bust ) If I had time I would make it in ICE Simulation but this time it is key animation by hand . 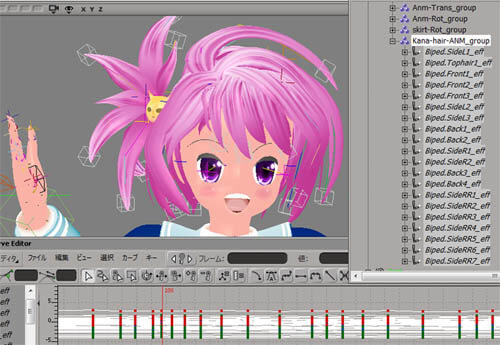 目パチだけでキャラクターが生きてきます。(ゲームデータの場合、表情はNullを骨としたエンベロープ設定で表情を作成したりします。) Continuing is , Facila animation using Shape Manager. Eye blinking and lip animation . Eye Blink make character full of life. (Using facial as game data , null envelope method might be beter .) 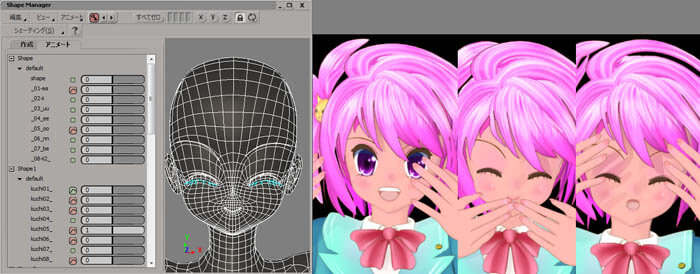 今回3Dキャラクターにある決まったモーションデータを乗せるという順序だったので、その動きにあわせるかたちでカメラを設定する、 ということでカメラワークの設定順番が最後になりました。 And last came the Camera work. Having a certain Motion to be on 3D Character , this time Camera movement came at last . カメラの動きはパスアニメーションで作成します。 滑らかな曲線的な動きをつけやすい事、動く位置を視覚化できる事、そして何より変更が非常に容易な事からです。 特に100回、200回とリテイクの多いアニメーションを扱う場合、非常に強力な手法となりますので、ぜひマスターして欲しいアニメーション技法です。 Camera animation is made using Path Animation . Smooth and Round move , Visualized moving point , and most reasonable is it's very easy to adjust . Especially if your retake is so many like hundreds , Path animation can be a very powerful way of animating . 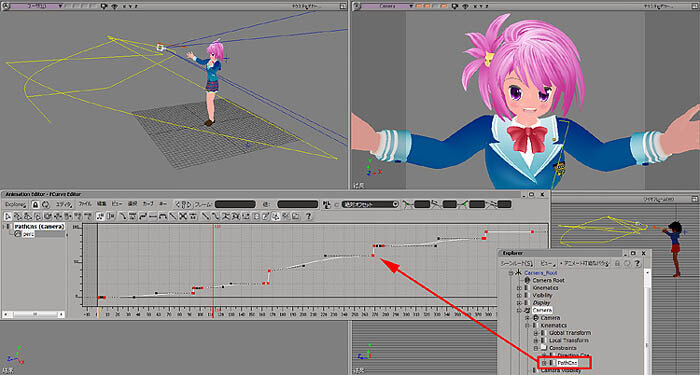 5番目のアニメーションの状態5th Animation |
| ICEによるエフェクト;ICE effect そして、ICEでパートをたくさん飛ばすエフェクトを作成してみました。 BGとしてのものとキャラ手前に湧き出る感じのものと2つ用意しています。 And made a effect using many particles with ICE . There are two , one for background , other with emit from front of the character . 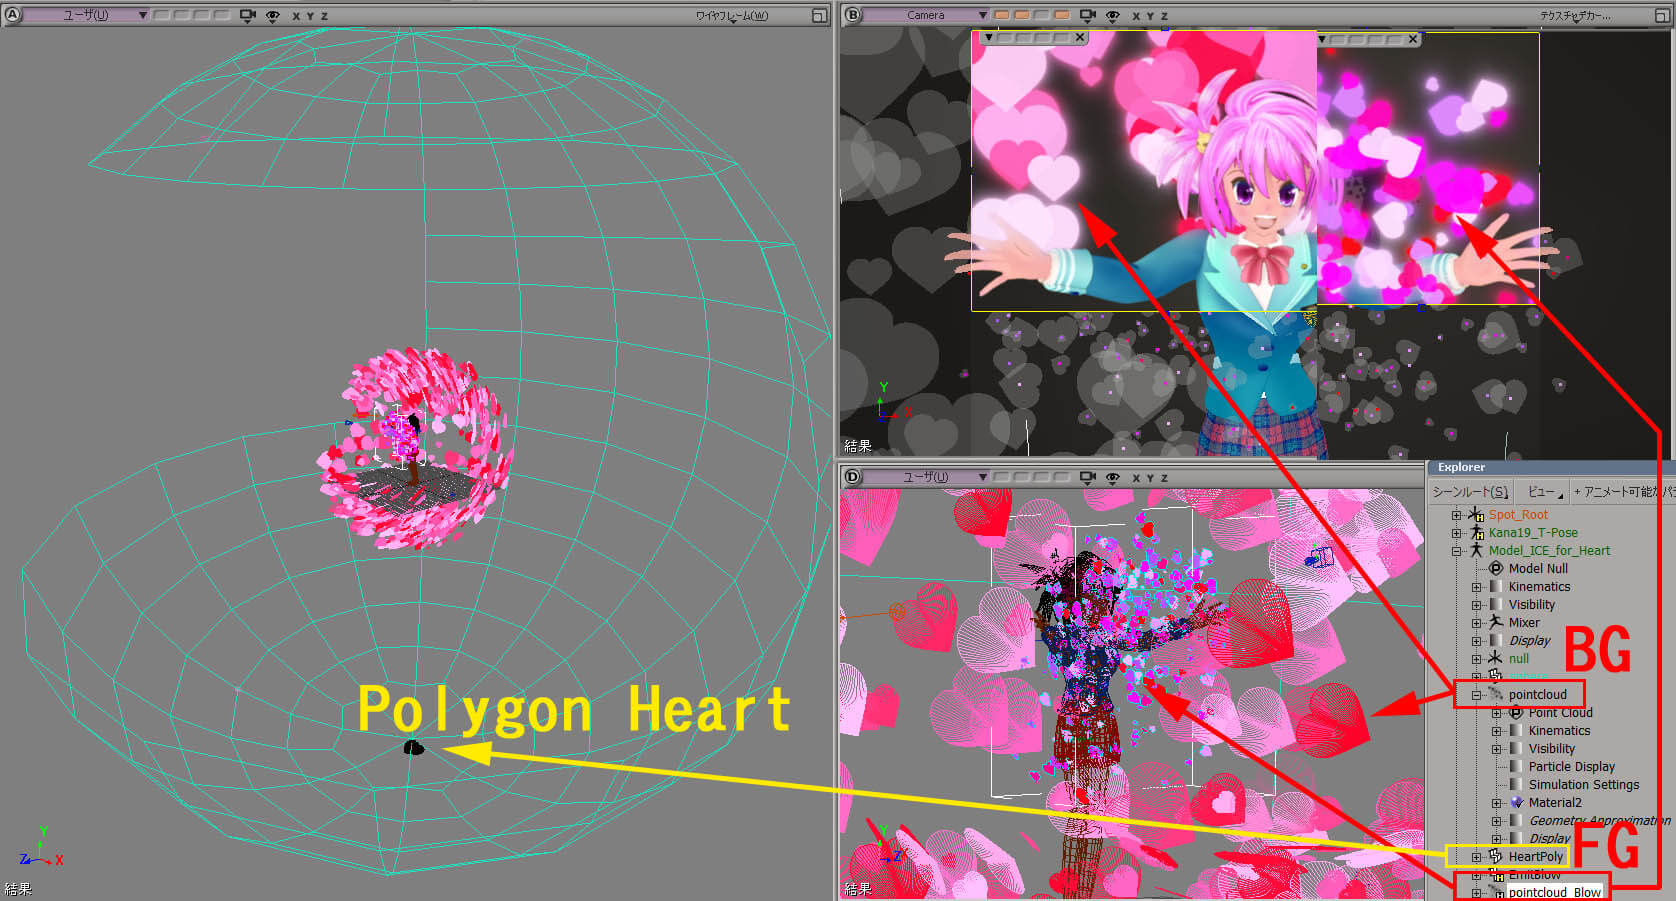 カメラ移動付近にはパーティクルが発生しないようにEmit用のポリゴン面が無い、なんてすぐ気が付く点などです。 Many has written before this page , but this time it might be most close to movie making . Seeing some detail , you may find some new things . Like , you will soon notice , that near the Camera , there are no particles emitted by deleting emit polygon faces . まずは、ハートですが、ポリゴンのインスタンスを利用しています。 最初、テクスチャーのハートで作成したのですが、レンダリングの時にグローが欲しかったので、 ポリゴンになら レンダリングモジュール > プロパティー > グローと簡単に付けられます。(グローはアウトプットシェーダーに属します。) 色は白にしておき、RenderTreeのマテリアル設定で ICEのパーティクルの色が反映するようにしておきます。 The Heart are polygon instances , which first was textures . Because switching to instances , was the need of Glow rendering . Glow is an Output Shader , easy to attach in Render Module > Properties > Glow . Leave the Color White , which will get particle color , by setting in the Render Tree with Color_Attribute Node . 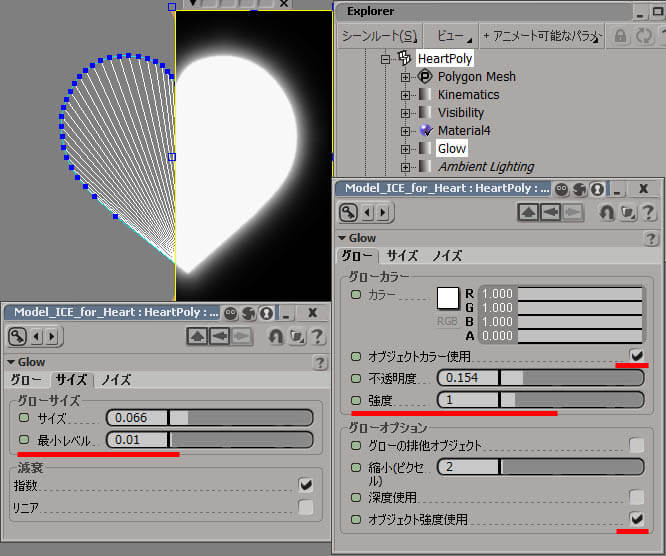 In the Color_Attribute Node set Attribute as Color , and get the alpha as transparency . 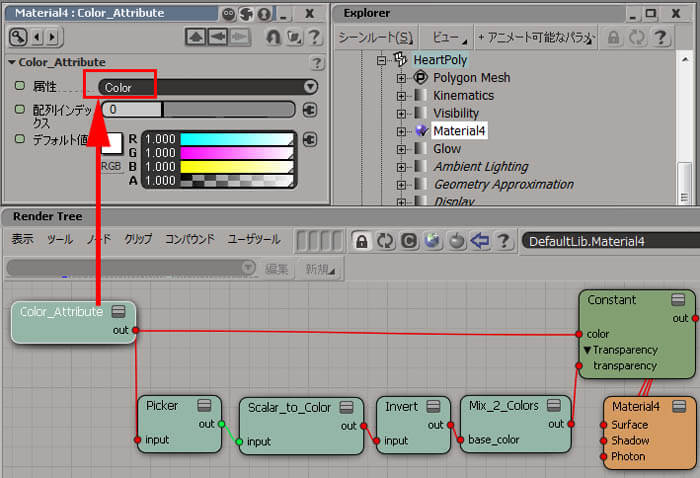 赤からピンクにかけての色をランダムに Randomize Color by Gradient で設定されるようにし、更に Modify Particle Color で発生後の個々のパーティクルの透明度が その寿命とともに変化し、透明から発生して透明になって消えていくようにしてあります。 動きとしては、 Align Particle to Camera でポリゴンの板が常にカメラの方を向くようにしてあるので、カメラカットでカメラが移動してもポリゴン面は追従します。 Orbit Around Controller で中心にあるNullの回りを回転するように設定してあります。 This is ICE settings used as background . Rate has many but has Age Limit delete . Randomize Color by Gradient make a particle's color one from Red to Pink , and also Modify Particle Color makes transparent at particles beginning and end of it's life . Align Particle to Camera make polygon instance always face towards camera , and Orbit Around Controller make particle go around center of a null . 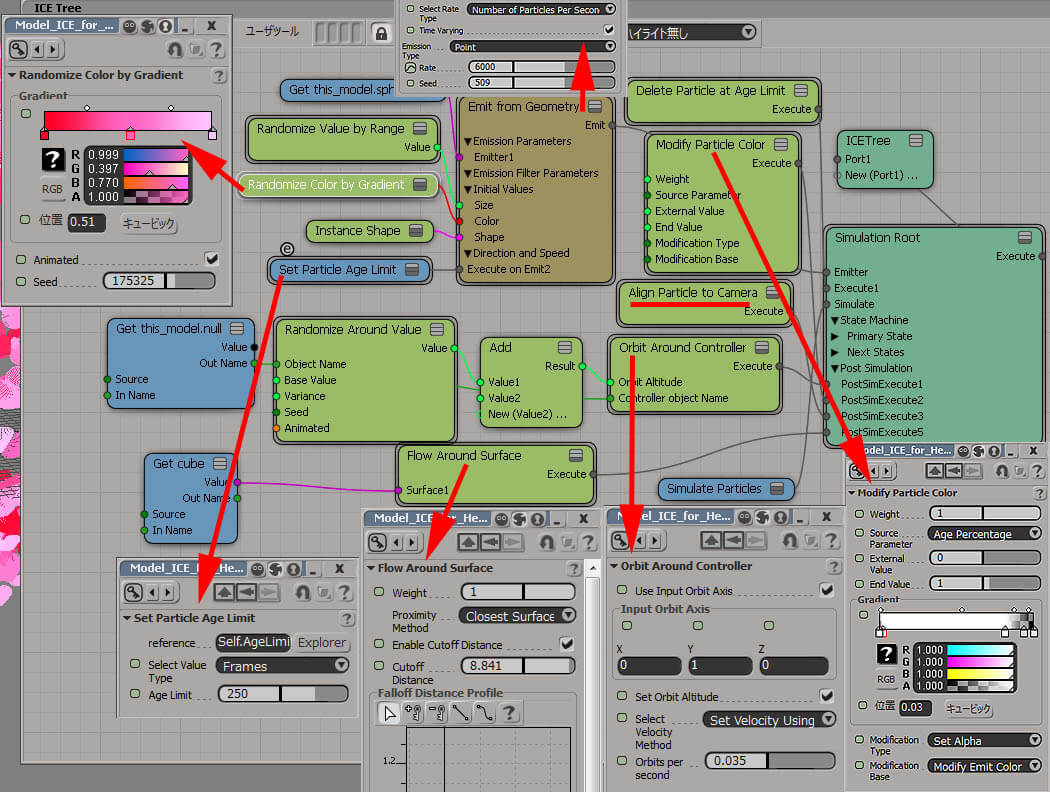 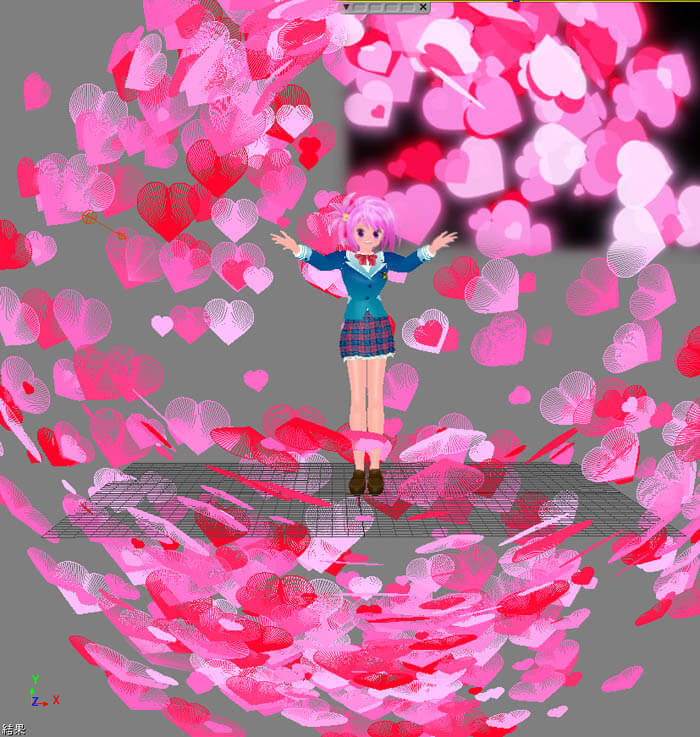 パーティクルの寿命%によって大きさが変化すること、LeafFallingMotion からランダムな回転が設定されていることです。 コツさえ覚えればある程度は皆同じで、ちょっとした違いで色々と変化のあるパーティクル設定が可能なのがICEの面白いところです。 This is ICE settings used with the Character in front . The Emitter has a hole like a doughnut . Particle size will change with it's age % using Fcurve and Randomize Value . LeafFallingMotion will make a roll with Randomize Value again . 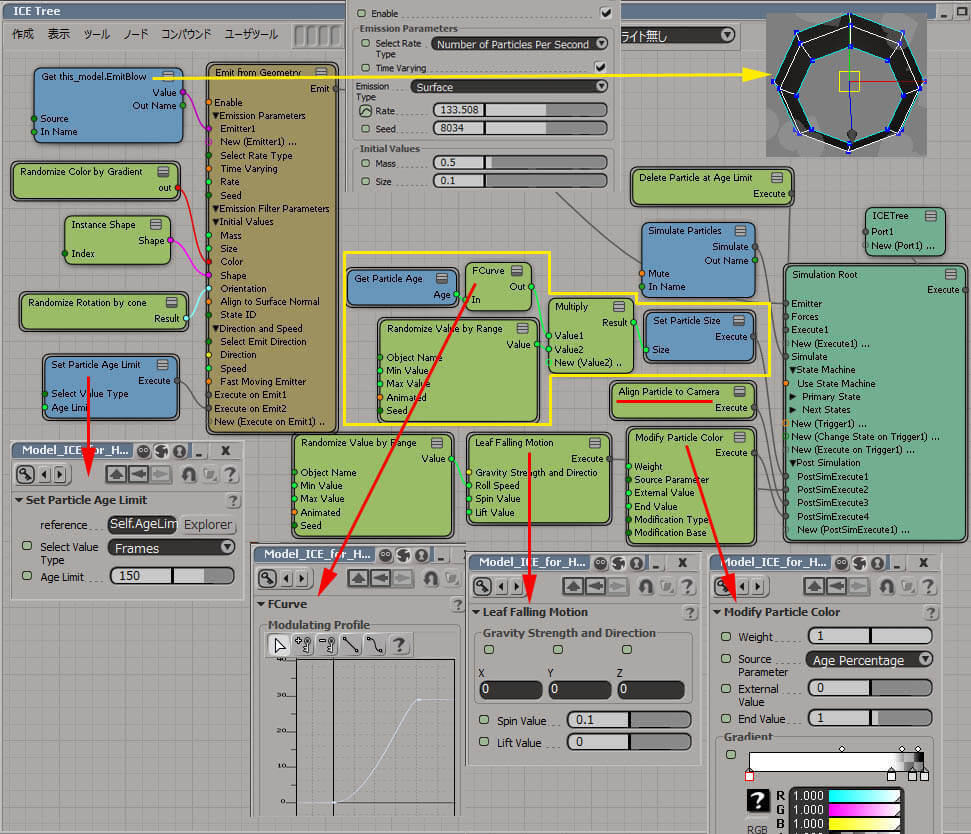  これはカメラの子供に配置してあるポリゴンで、その回りをパーティクルが滑って行くので カメラの正面にはなるべく来ないように防いでいる、っていう不思議なものです。(あまり強くないですが・・) If noticed , ICE for BackGround had a node Flow Around Surface . A polygon Cube is attached to this node , which is a Child of the Camera . This cube prevent particle to get in front of Camera by sliding away this Cube .(But not so strong ...) 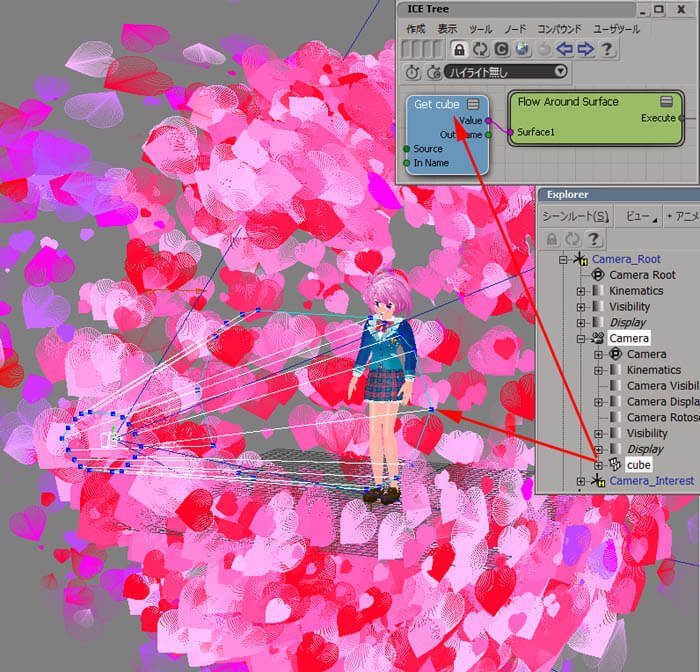 |
| FXTreeによるコンポジット;FXTree Comp 今回もコンポジットは、Softimage 内包のFXTreeでやってみました。表示 > レイアウト > 合成です。(Softimage動かせる方は皆持っているかなり優れたコンポジッターです。) そんなに複雑なことはしていませんが、少ない素材でそれらしい映像に仕上げてしまいます。 キャラ用の映像としては、顔、特に目あたりにパーティクルが絶対被さらないようにグラデーションでマスキング処理しています。 Used FXTree as a composite again . FXTree is a Softimage Default Comp can find in View > Layout > Compositing . No doing so complicated , making so looking movie with small amount of data . For Character Movie , Face , especially around Eyes , Mask is used which is made from Gradation Node , not to get a particle in front of Eyes . 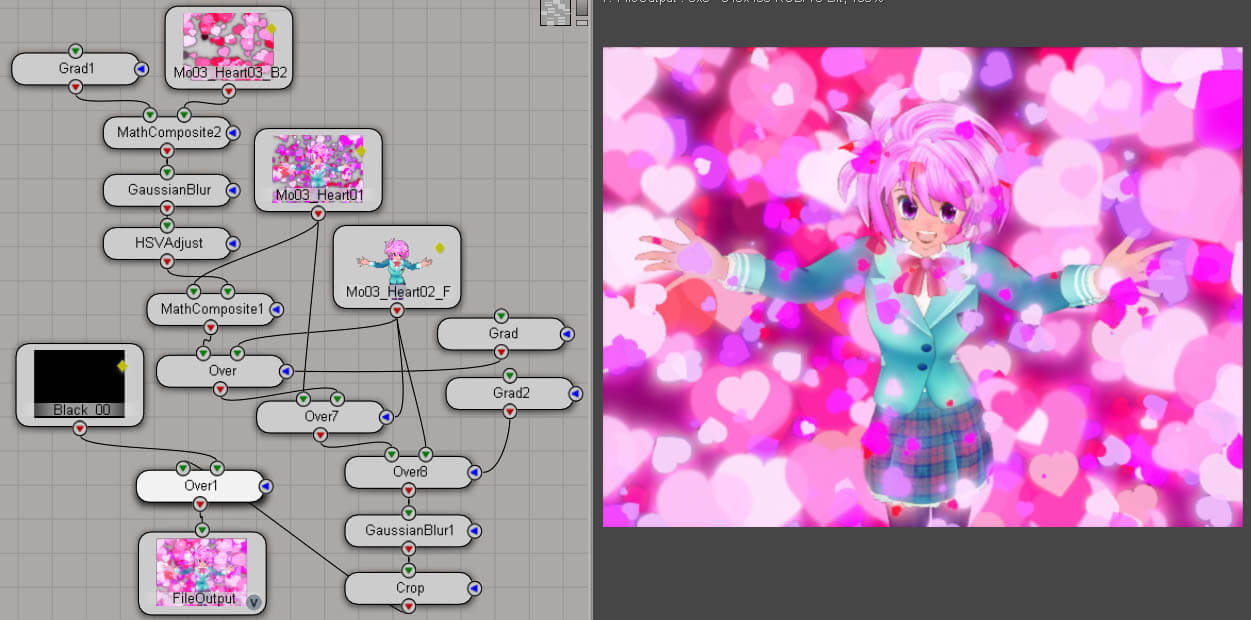 BG用ICEのレンダリング連番画像に移動アニメーションの付いた濃いピンクのGradationをスクリーン合成、 GaussianBlurでぼかしてHSVAdjustで色味を明るくし、FG用ICEとキャラを一緒にレンダリング連番画像と最大(Max(A,B))で合成、 顔部分をGradationで作ったマスクをキャラのみのレンダリング連番画像を Over で合成、 この工程をもう一度行って色味調整、 GaussianBlur でぼかし、画像を640X480に Crop し、ムービー開始と終わり用のBlackとフェードイン/アウトするようにOverで合成しています。 Some explanation . Pink Gradation is MathComposite with BG ICE particle picture as Screen , GaussianBlur and HSVAdust make Blur and Brighter Color , MathComposite that with FG ICE particle and Character picture as Max(A,B) . Face Mask Gradation go Over Character only picture sometimes , GaussianBlur again Crop to 640x480 , render to FileOutput with Black Fade-In / Out at the Beginning and Ending of this movie . 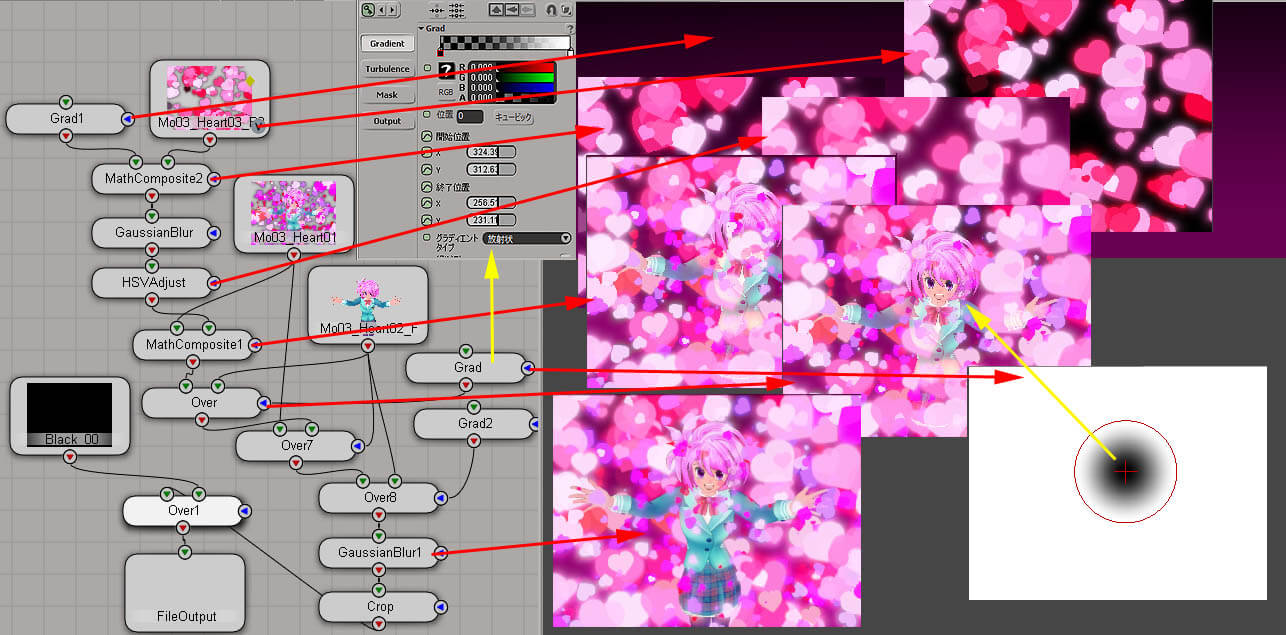 左上の「レンダ...]ボタンを押すと素早いレンダリングが行われてAVIが指定されたフォルダーに書き出されます。 In FileOutput node , set your Start End frame and Codec (Uncomp) , start Render from [Render] button . 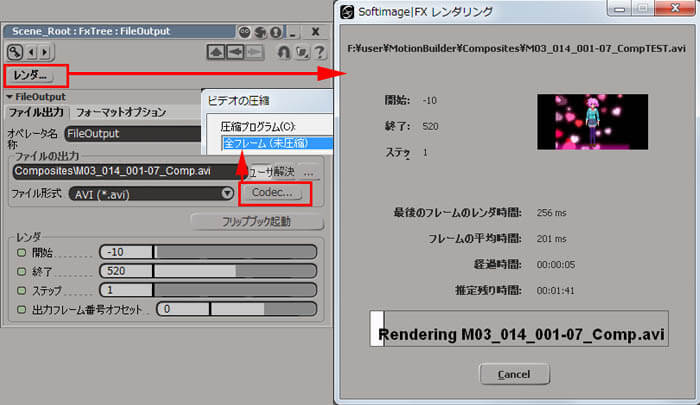 書き出し画面でオーディオファイルにWAVファイルを設定して [OK] を押します。(細かい設定はできませんが。) If you want audio with AVI file , you can use FlipBook . Add WAV file to output . (Not so many things you can do ...) 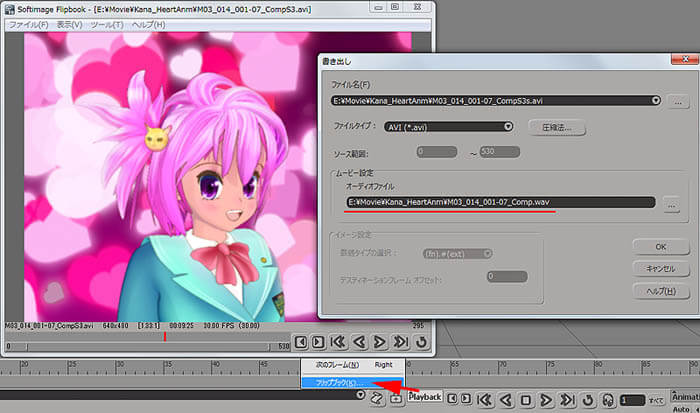 |
| 音声追加、完成へ;Adding Voice , Result さて最後はヴォイスを映像に合わせて完成させます。(CV深田愛衣さんです。サンキューです。) 短いムービーなのに手間だけはかかってしまいました・・・・ At last movie with voice(Voice Actress Fukada Ai , thank you) Took some time to make , movie is so short though ... 完成アニメーションの状態(CV ; 深田愛衣)Result Animation(Voice Actress Fukada Ai ) |
| という訳で、次回は... What's Next ... 乞う、ご期待!! Stay tuned ..
|