- ITソリューショントップ
-
製品・ソリューション
-
ダイキンのIT
 製造業向けITソリューション
 品質DX支援 QX digital solution
 建設業務改善ソリューション
 ビル管理業務支援 DK-CONNECT BM
 FILDER SiX TOP
 FILDER SiX 電気 TOP
 Rebro D TOP
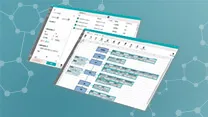 実験記録をデータベース化 ParsleyLab
 マテリアルサイエンス向けソフト Materials Studio
 熱力学物性予測ソフトウェア COSMO
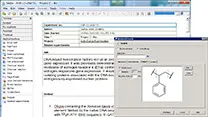 電子実験ノート
 総合3DCG 制作ソフトウェア Maya
 総合3DCG 制作ソフトウェア 3ds Max
 3Dキャラクタアニメーション制作ソフトウェア MotionBuilder
 モーションキャプチャーシステム Xsens MVN
 |
| RelationConstraintを利用したスプリング的な動き; Spring like animation using RelationConstraint Damp(Rotation), Damp(Position) MotionBuilderには、Softimage の ICE のように、 ノードをつなぎ合わせて目的の動作を作れるRetationConstraintというものがあります。 しかも ICE を知っている方は、似たような操作からRetationConstraintを素早く理解できます。 まずは、このRetationalConstraintで移動と回転をつなげてスプリング的な動きを作ってみましょう。 MotionBuilder has Visual programming , like ICE in Softimage , called RetationConstraint . So , if familiar with ICE than it's very easy to handle this RetationConstraint . To begin , let's join Transform and Rotation to make a spring like animation , using RetationConstraint . 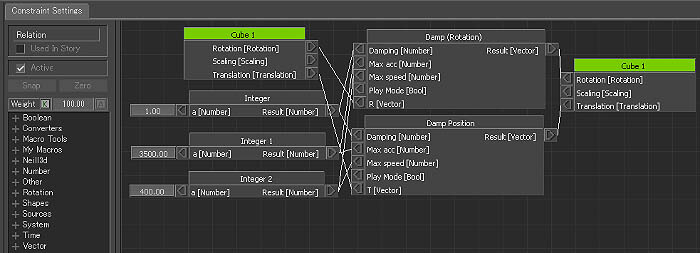 するとNavigator 上の Constraints 以下に Relation が作成されるので、それをクリックすると 中央の画面がRelation用の設定画面になります。作業はこの中で行います。 この時、中央の画面がConstraintSettings 以外の画面にならないように、左上のカギマークをロックにしておくと作業がしやすいです。 Get 3 Cubes and make it in a hierarchy , Drag&Drop the AssetBrowser > Template > Constraint > Relation to View port . In Navigator > Constraints , there is Relation , click it . Constraint Setting window will appear , Lock this window by clicking the ICON above . 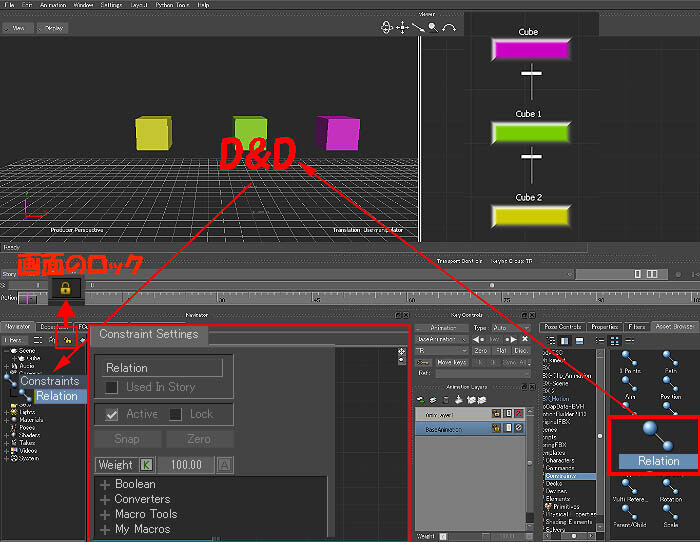 Sender と Receiver を選択する表示 が出るので、両方を作成します。 続いて、Rotation 項目の中の Damp(Rotation)と Vecter 項目の中の Damp(Position)を取り出します。 もうなんとなく解りますよね。これらをつなぎ合わせます。このようなノード間を 接続して設定するのは、ICEに非常に似ています。 Select the 2ndCube1 , with ALT+LMB Drag&Drop cube1 to Constraint Setting window , make both Sender and Receiver node . Get Rotation > Damp(Rotation) , Vecter > Damp Position node from Left Menu . Knowing this kind of connections in ICE , can guess what to link . 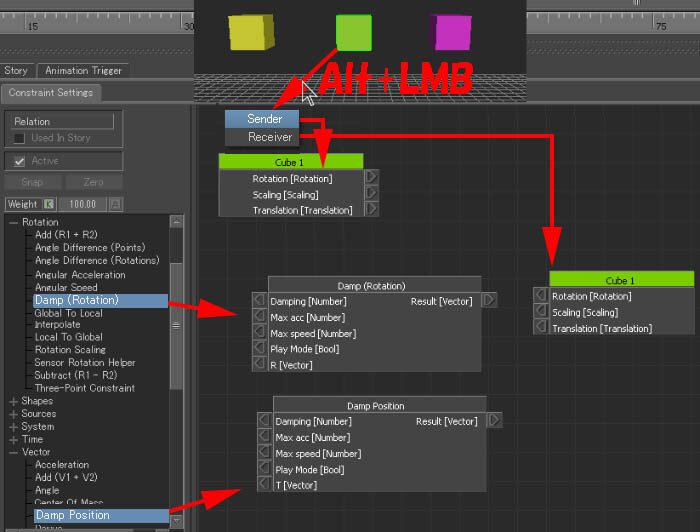 Number 項目からInteger を取り出し 各設定値を入力します。 Link Sender Rotation to Damp(Rotation)R [Vector] to Receiver Rotation , Link Sender Translation to Damp Position T [Vector] to Receiver Translation . Get Number > Integer node . 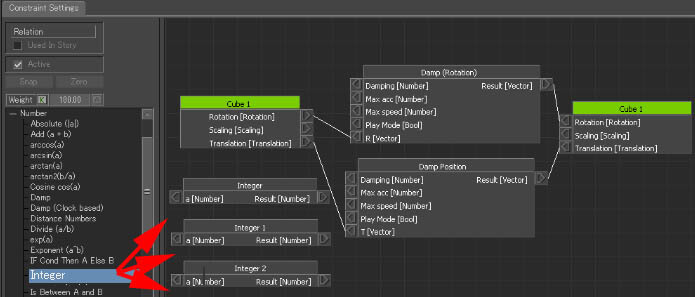 Dampingに1.0 Max acc に3500Max speedに400を接続します。 Click left side input with RMB in Integer node , will appear Set Value , put in numbers as follows . Damping ; 1.0 , Max acc ; 3500 , Max speed ; 400 . and link to it 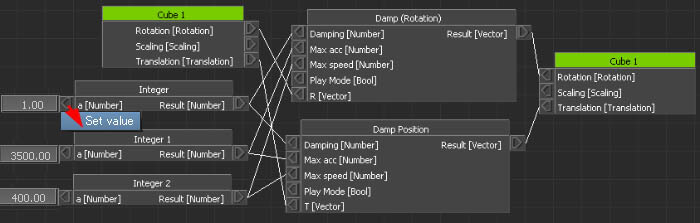 領域選択を使って複数を選択状態にし、コピー(Ctrl+C)ペースト(Ctrl+V)します。 Do same thing to the 3ndCube2 , make both Sender and Receiver node . Use Copy(Ctrl + C ) and Paste(Ctrl + V) to make another set . 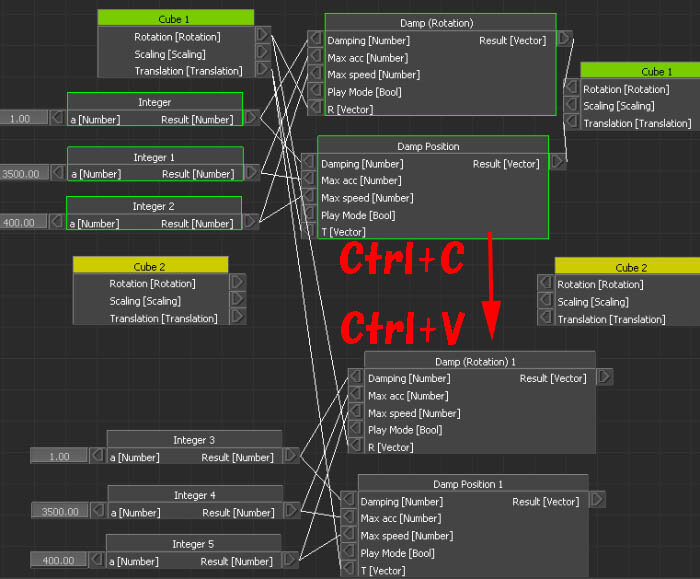 Change some numbers as , Damping ; 1.0 , Max acc ; 3450 , Max speed ; 200 . 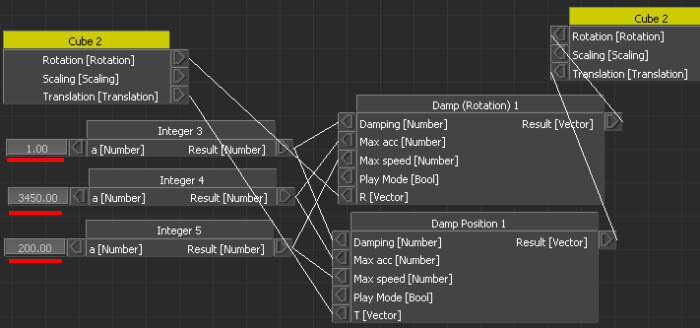 Moving and Rotating the first parent cube , others will follow with different velocity .  |
| RelationConstraintを利用したスプリング的な動き ; Spring like animation using RelationConstraint Damping(3D) 上記設定でも面白い動きをするのですが、動きが収まる時の挙動に不自然さが残ります。 そこで、同じような手法とノード名なのですが、Damping(3D)と いうノードがあるので、これを使ってみます。 Cubeを3つ取り出し、親子階層にし、Asset Browser の ConstraintからRelationノード を画面上にドラッグ&ドロップします。 Navigator上の Constraints 以下の Relation をダブルクリックして中央の画面をRelation用の設定画面にします。 階層下の2つCubeを選択状態にしてAlt+左マウスクリックの状態でドラッ グ&ドロップすると、SenderとReceiverを素早く作成できます。 Above settings has some unlike movement when settling. Next one will use Damping(3D) node. Do the same setting with 3 Cubes. 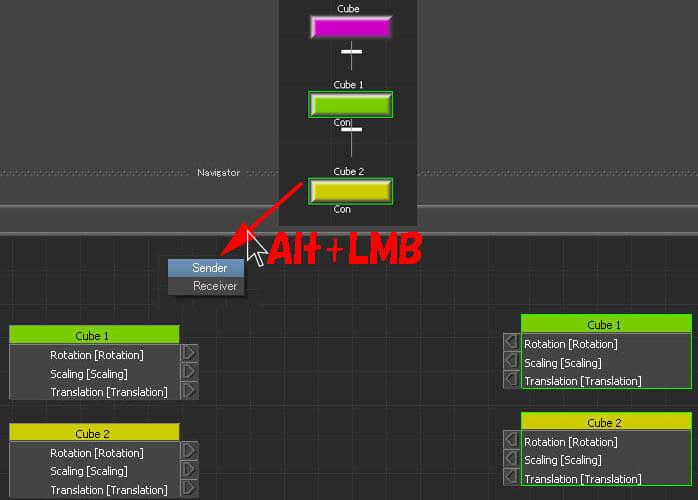 Damping(3D)は、各ノードの Rotation と Translation に接続するので、2個ずつ、合計4個用意します。 Get Number > Integer node , Other > Damping(3D) node . Damping(3D) is used both Rotation and Translation , so get 4 of them . 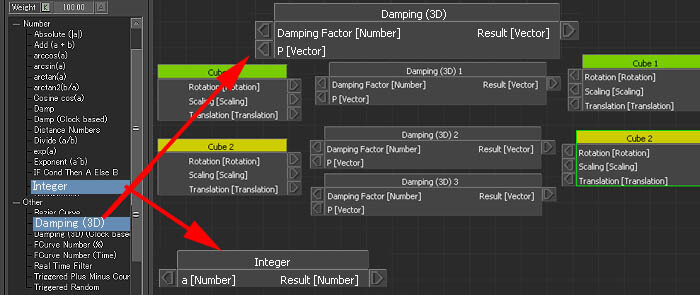 SetValue 20 to Integer node and link it to Damping(3D); Damping Facter . 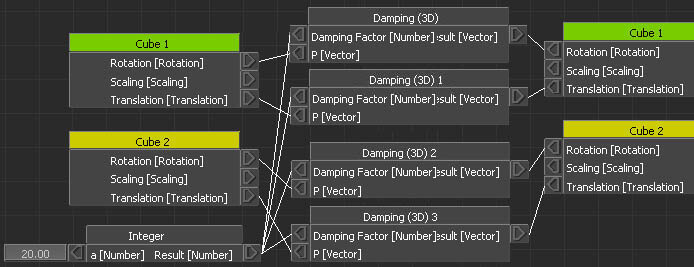 This has more good moving . 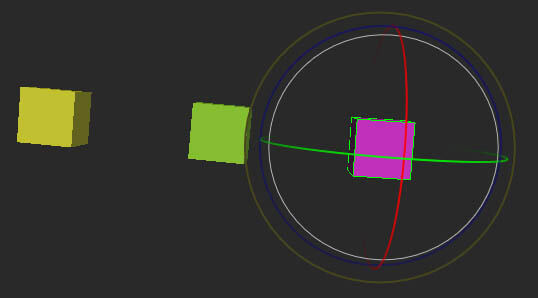 |
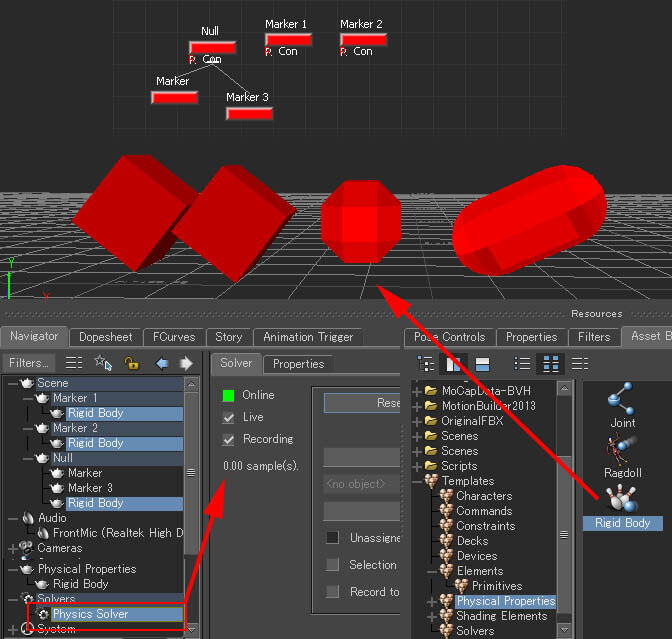
| Rigid Body の Joint の Spring ;Rigid Body , Joint Spring PhysicsSolver さて、次は MotionBuilder 2013 に用意されているPhysicsSolver まり物理計算を利用した ものを紹介します。
PhysicsSolver には2つのエンジンが選べ、ODE 0.11とPhysX 2.8.3があります。 この RBD のJoint 設定にSpringがあり、同じくバネ的な動きが可能で、衝突判定を付けられる点が RBDの利点です。 3つの Cube を用意し、2つの Null を2つのCubeの位置に設定します。 この Null に Joint の設定をするのですが、階層構造にはしないで先に進み ます。 This time , is RigidBodyDynamics in MotionBuilder 2013 , node to use is PhysicsSolver inside AssetBrowser . PhysicsSolver has 2 Physics Engine , ODE 0.11 and PhysX 2.8.3 . In this RBD , there is Spring setup inside Joint , and can also get collision . Get 3 Cubes and 2 Nulls , place the null to cube and cube1 . Nulls are to set joint , but don't put them in hierarchy . 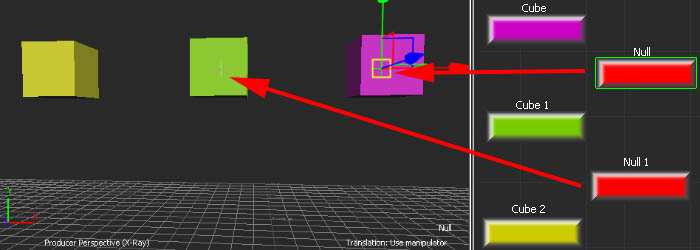 AssetBrowser の Solver 項目から PhysicsSolver をシーン画面にドラッグ&ドロップします。
Drag&Drop the AssetBrowser > Template > Solver > PhysicsSolver node to VIew port .Navigator 画面の Solver項目内にPhysics Solver が追加され、クリックすると Solverタブの設定画面が表示されます。 Physics Solver will apear in Navigator > Solvers , with click , Solver Tab will show . 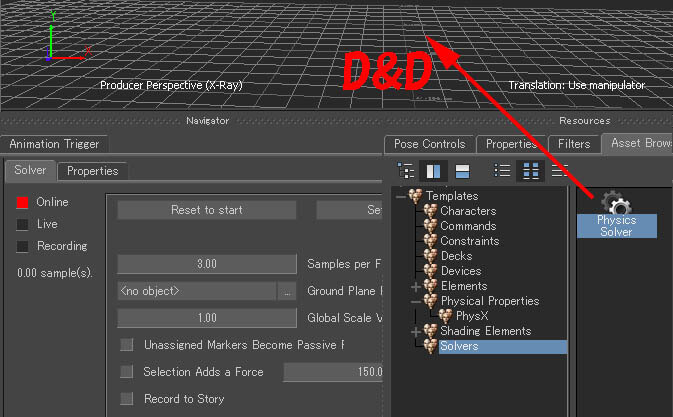 AssetBrowser の Physics Properties 項目から RigidBody を、Cube1に 1つ、
Cube1と2を選択した状態でもう1つ上にドラッグ&ドロップすることで 設定します。 Navigatorで見ると、Cube1と2には共通設定として設定されています。 Drag&Drop one AssetBrowser > Template > Physical Properties > RigidBody to cube . Select both cube1 and cube2 , Drag&Drop one AssetBrowser > Template > Physical Properties > RigidBody to them . See Navigator that cube1 and cube2 has same RigidBody1 node as common setting . 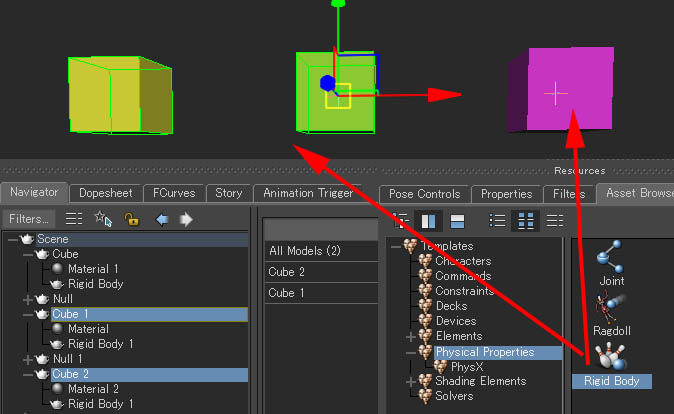 Cube に設定したRigidBody の設定では、ActivationをPassive にし、
Cube1 と 2 に設定したRigidBody の設定 では、Correct Mass Center のチェックを外しておきます。 Set cube's RigidBody as Activation > Passive , cube1 and cube2 's RigidBody is Activation > Active , and check OFF the Correct Mass Center . 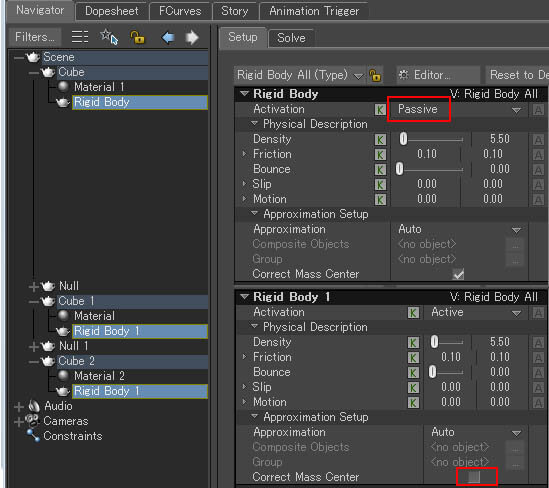 各Nullにそれぞれ、AssetBrowser の Physics Properties 項目からJointをド ラッグ&ドロップします。
最初のJointの設定では、CubeとCube1の 順に選択したものをConnections項目上にドラック&ドロップすると必要な入力設定をしてくれます。 同様にJoint1の設定も、Cube1とCube2 の順に選択したものを、Connections項目に設定します。 まだ、Joint の Type は Ball になっています。 Get AssetBrowser > Template > Physical Properties > Joint to each Null , set to first Joint , select cube and cube1 , Drag&Drop to Joint.Connections , will set up connections automaticly , next , to second Joint , select cube1 and cube2 , Drag&Drop to Joint.Connections . Joint Type is still Ball . 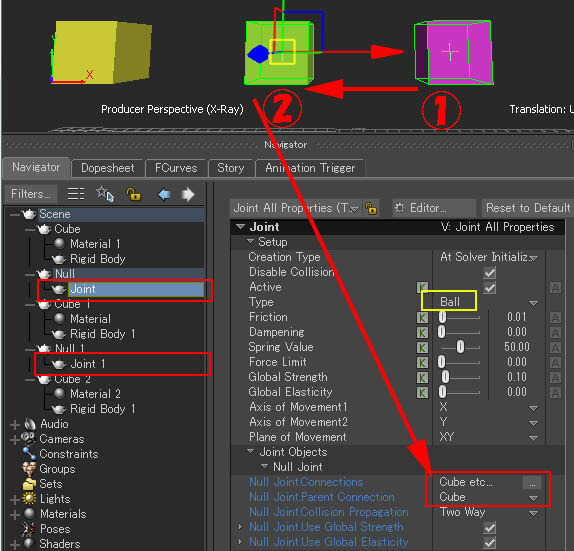 ここまで来たら、必ずシーンを一旦保存しておいてください。以下でシミュレー ションを実行した後、元の状態に戻したい場合には
ここで保存したシーンを読み直すということも必要になるかも知れないからです。 Nabvigator の Solver項目内 にPhysics Solver をクリックして設定画面を表示させ、 ■ Onlineを■緑にして、Live とRecording に チェックが入ると物理計算が始まります。 今、ここでは先ほど見たJointの設定がBallになっているので、ブランブランと垂れ下がる動きになります。 これはこれで アクセサリーの動きとして面白いと思いますが、バネ的な動きに変えます。 Save the Scene once here . Simulating something and want to goback to fix , backup is needed sometimes. Nabvigator > Solver > Physics Solver , click and show the Solver Tab , put ■ Online to ■ , checks are on in Live and Recording , simulation will start . Since Joint Type is Ball , it will hang down . This is good move for some accessories , but want to change to Spring . 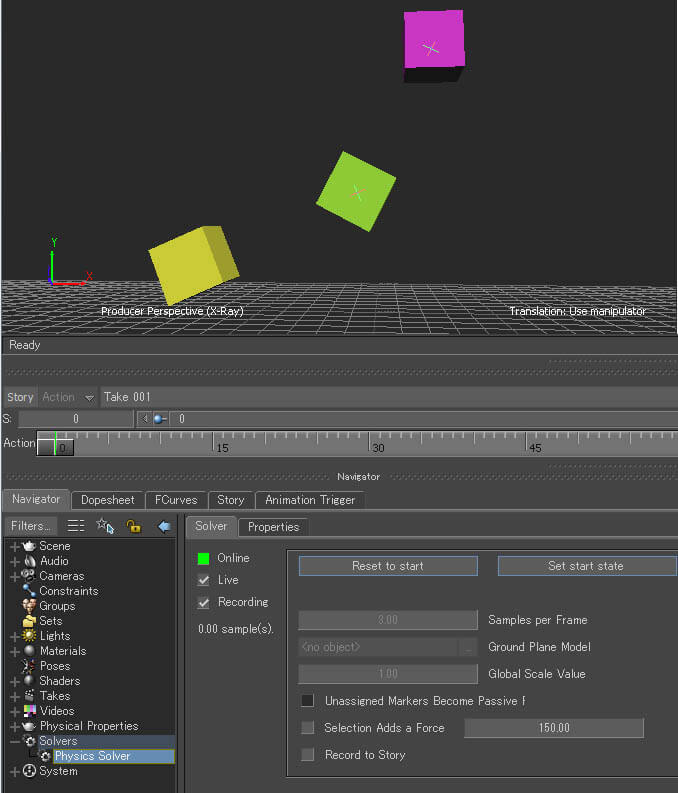 各Jointの設定で、Type をBallからSpringに変えてから再度■ Online と、Live とRecording にチェックを入れてください。
今度はバネ的な動きになっているはずです。 Set the Joint Type to Spring , and simulate it . This time it will be a spring animation . 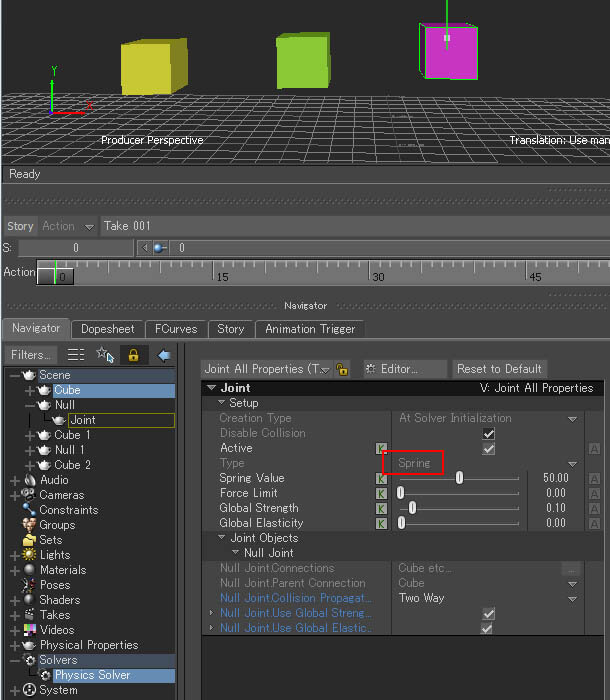 例えばプリミティブの pSphrer を取り出し、それにPassive設定のRigidBodyを付けると、各Cubeが衝突して動きます。
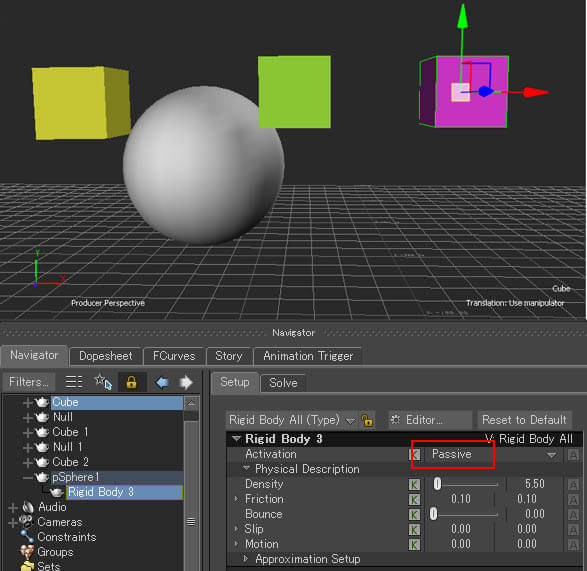
If you get a pSphre and set RigidBody as Activation > Passive , cubes will hit the pSphre .
 |
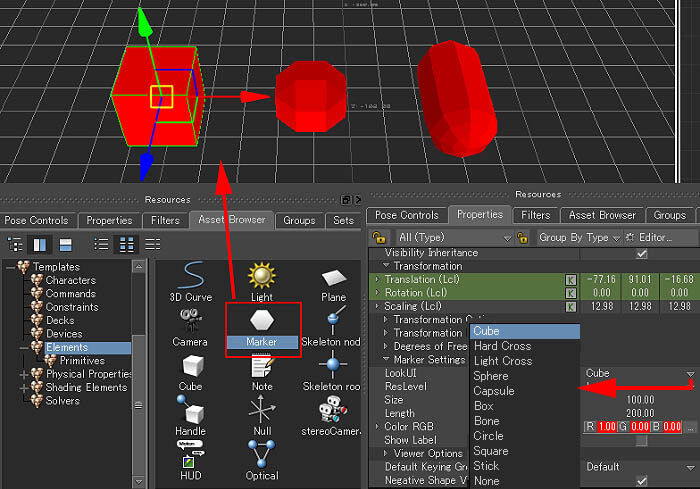

| Rigid Body と Joint; Rigid Body and Joint では、上記で触れたように、カプセル形状の Marker を使って、尻尾やロープのような動きを作成してみましょう。 最初の MarkerはCubeのままして、Null を作成して左側に寄せて置き、次にまた Marker を作成して Capsule の形状にします。 Null とCapsule を同時に選択した状態で複製を作成して、どんどん延ばしていきます。 最初のCube の Marker は Rigid Body の設定を、Passive とします。 複数のCapsule の形状の Markerを同時に選択状態にして、共通の設定でActive とします。 複数のNull を同時に選択状態にして、共通の設定で Joint の設定をします。 Let's make a tail or rope like animation , using Capsule LookUI and Null Joints . Leave the first Marker as Cube , make a Null on left side of it , make 2nd Marker as Capsule . Select Null and Capsule , Copy&Paste as long as you want . Set first Cube; Marker as AssetBrowser > Template > PhysicalProperties > RigidBody > Activation > Passive. Select all Capsule; Marker and set AssetBrowser > Template > PhysicalProperties > RigidBody > Activation > Active as common setting . Select all Null , set AssetBrowser > Template > PhysicalProperties > Joint as common setting . 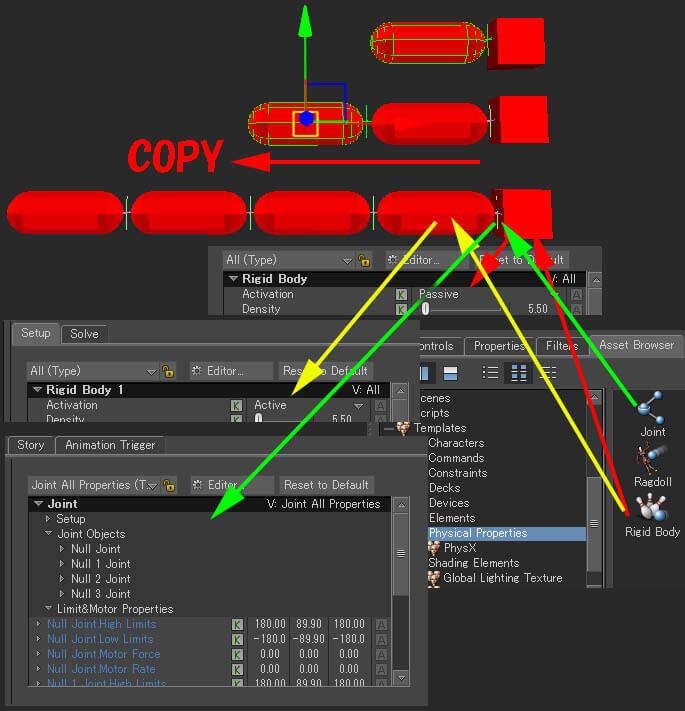 Hight Limit 40.00 30.00 40.00 Low Limit -40.00 -30.00 -40.00 としました。 Joint の Type は Ball になっています。この状態でLive状態で動きを見て調整します。 To set all Joint High And Low Limits at once , select all Null Joint node and set it in Properties tab . Hight Limit 40.00 30.00 40.00 Low Limit -40.00 -30.00 -40.00 Joint Type is Ball , see how it moves in simulation . 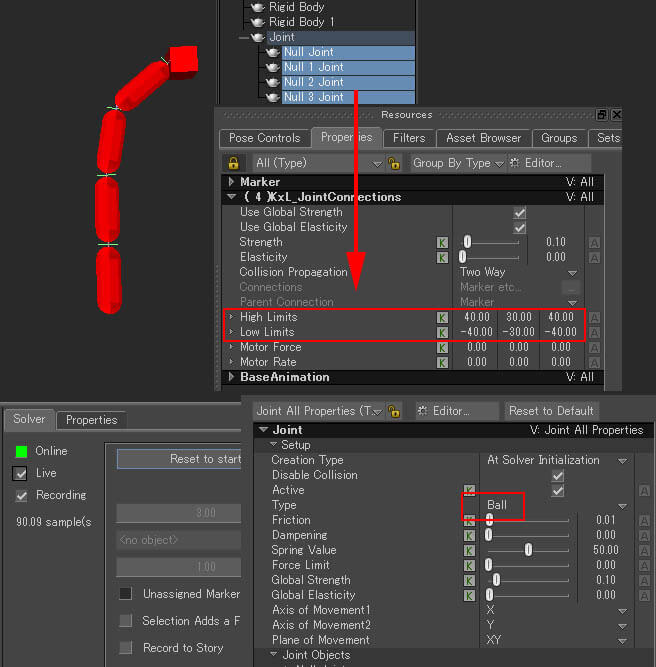 Frictionはほんの少しの値で良く 0.20 、GlobalStrength 0.05、Global Elasticity 0.22 としました。 あとは、Liveの時の精度を上げる方法として、SamplePerFrame の値を 6 くらいに上げたり、 InteractionPerStep を 256 くらいに上げるといったことができます。 Some values are very low to set , that make a littel hard to know . Friction is only 0.20 , GlobalStrength ; 0.05 , Global Elasticity ; 0.22 . Other things to make animation look good , is to make SamplePerFrame up like 6 , and InteractionPerStep to 256 which is in Properties Tab . 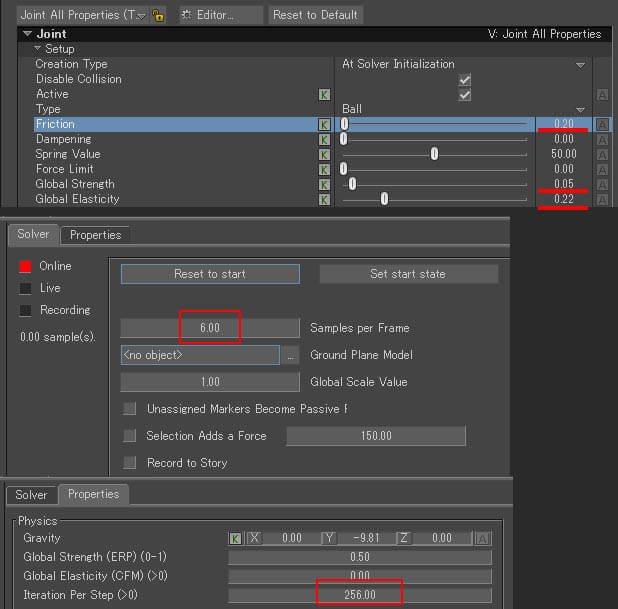 |
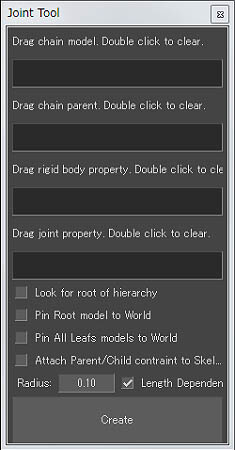
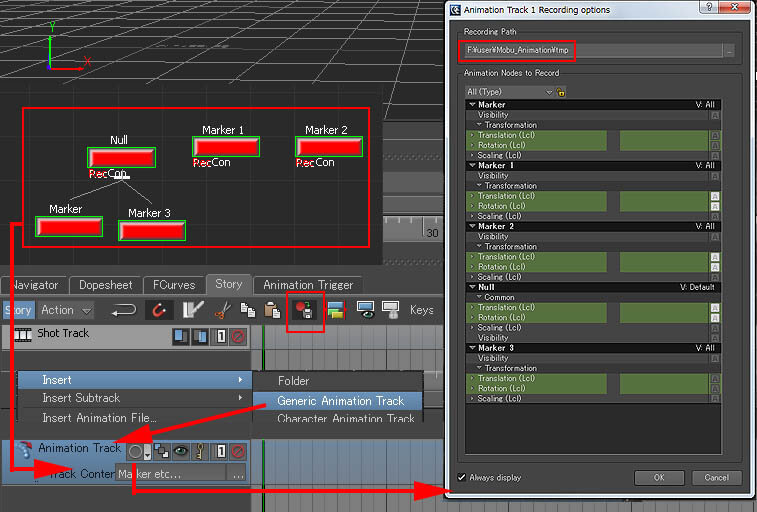
| Rigid Body の JointTool;Rigid Body JointTool JointTool_cool.py(2012, 2013,2014) 最後はこの Rigid Body をもう少し簡単に設定できる JointTool という pythonツールを紹介します。 各バージョンの py をユーザーのPythonStartupという ディレクトリー(無い場合は作成)してその中に保存します。 MotionBuilder を起動すると上部PythonTools プルダウンメニューにJoint ToolLast , is introducing a Python tool that can make up Rigid Body and Joints more easly . It is called JointTool which can put in users PythonStartup directory . After copying , JointTool will apear inside PythonTools pull down menu . 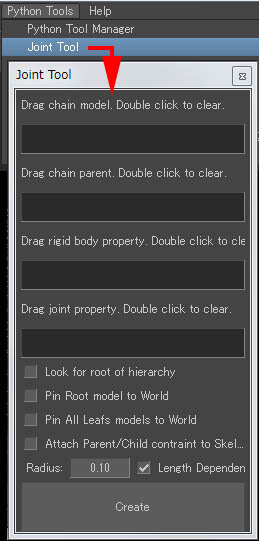
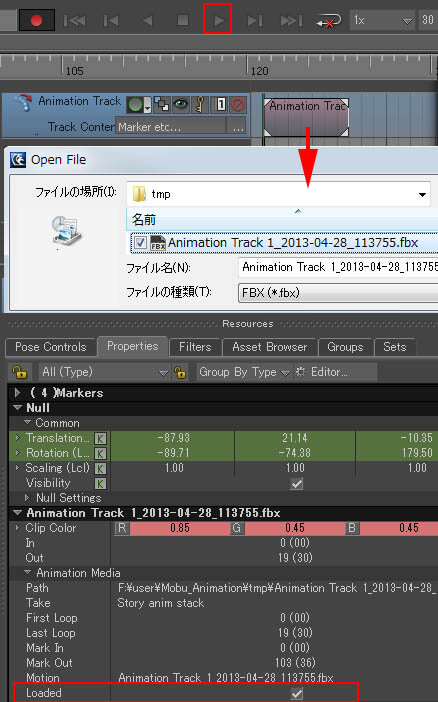
Softimage 上で尻尾かおさげのような骨構造体とポリゴンにエンベロープを設定して、FBXで書き出します。(Crosswalk 2014 使用) In Softimage , make a tail like bones and polygon with envelope set . Export the MODEL to FBX.(used crosswalk 2014) 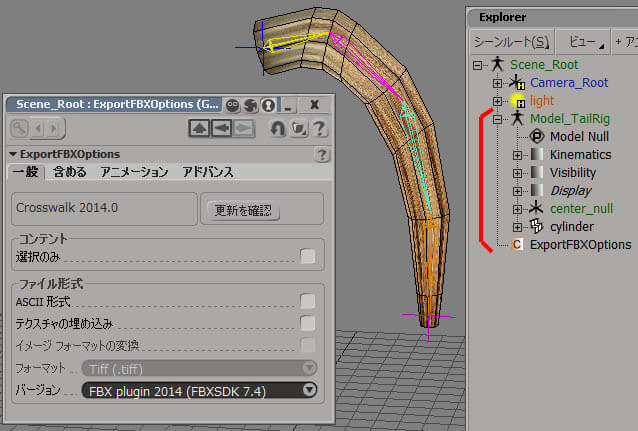 Marker を取り出し、骨の Root を同じ位置に置き、Marker を bone 以下の親とします。 PythonTools > JointTool で設定画面を表示させ、最初の空欄に bone 、2つ目の空欄に Marker を、それぞれ選択してALTキーを押しながらドラッグ&ドロップして持っていきます。 [ ] AttachParent/Child constraint to Skeleton...項目にチェックを入れて有効にします。 後は、一番下の[Create] ボタンを押します。 In MotionBuilder open the FBX , which scale is small , select the top object and scale up to X 10 , Y 10 , Z 10 . Get a Marker , set this to be the parent of bones. In PythonTools > JointTool menu , set bone to the first space , Marker to the second , by Alt+LMB Drag&Drop . Check On to [ ] AttachParent/Child constraint to Skeleton... . Click the [ Create ] Button . 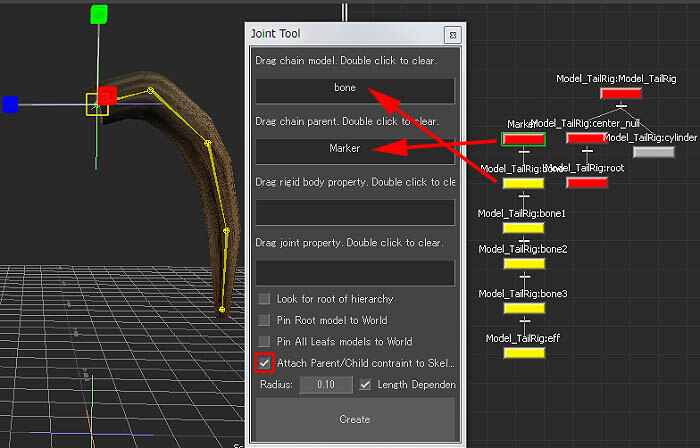 JointTool で作成されたCapsel 型の Marker はスケールで大きさ調整します。 Set Marker as AssetBrowser > Template > PhysicalProperties > RigidBody > Activation > Passive. Scale the Capsel;Marker to fit inside polygon . 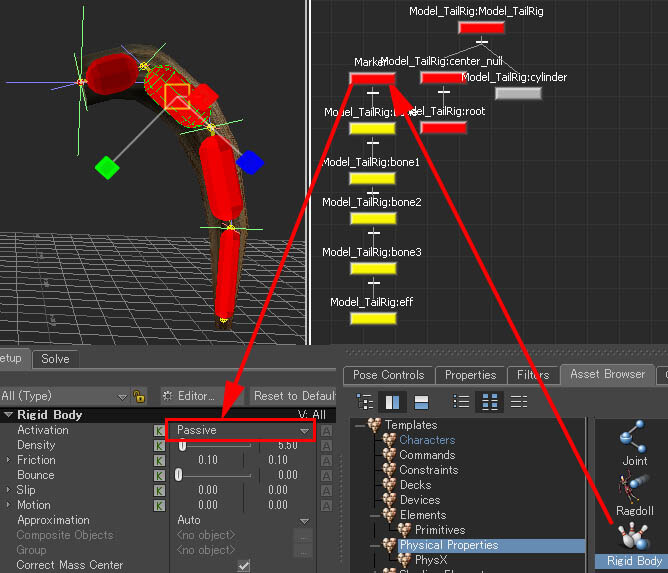 Snap 項目の[ Snap ]ボタンを押してから、全部のActive [ ]と次にLock [ ] にチェックを入れて有効にします。 In Navigator Constraints , select all Parent/Child nodes , click [ Snap ] inside PropertiesTab , and check ON Active [ ] , and Lock [ ] . 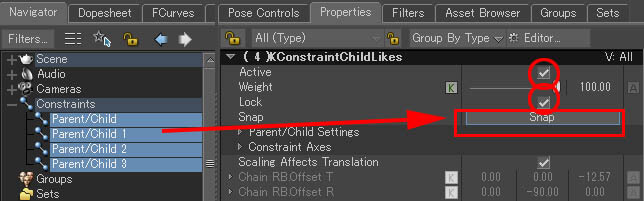 Typeを Universal 、Friction 0.20、Global Strength 0.04 、Global Elasticity 0.14 を設定してみました。 Select Physical Properties > Chain Joint Property , inside PropertiesTab change Type to Universal , Friction ; 0.20 , Global Strength ; 0.04 , Global Elasticity ; 0.14 .  HighLimit の X 、Yに 30 Low Limit の X 、Yに -30を一旦設定してみました。 Select all Physical Properties > Chain Joint Property > Chain J Joint , set HighLimit X , Y ; 30Low Limit X , Y ; -30 . 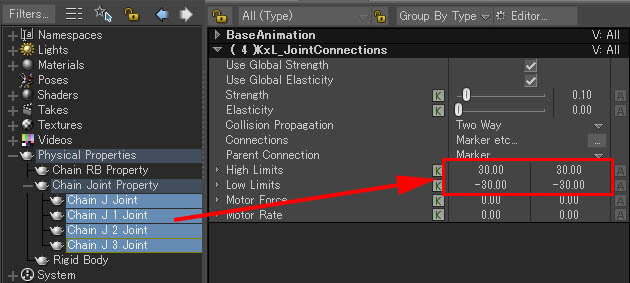 After testing , changed Chain J Joint Limits , from top , 0 , 5 , 20 , 40's . 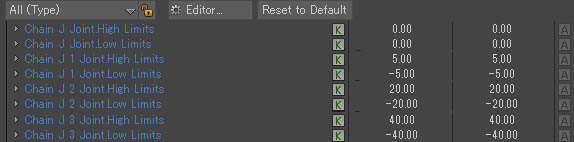 Set SamplePerFrame up to 6 , see how it moves . 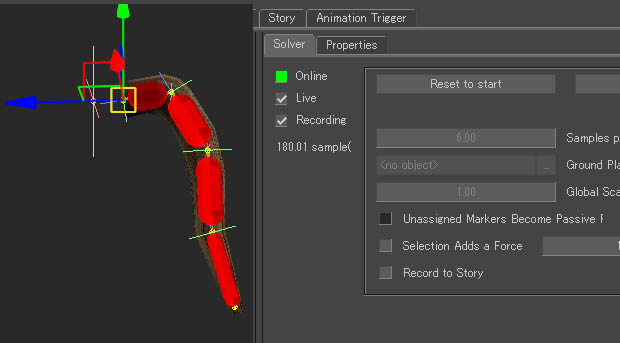 さて、以上でツールの話は終わりなのですが、せっかくなのでもう少し探求してみます。 上記で説明したStory に Clip として動きを Plot する方法で動きのデータを書き出し、Softimageに持って帰ってみます。 階層構造を元に近い形にして、親Null にキーアニメーションを設定してみました。 That's all for JointTool , but further investigation with Softimage . Useing the NEW Plot to Clip method , import the external FBX file to Softimage . Before doing so , make the hierarchy like the one imported . 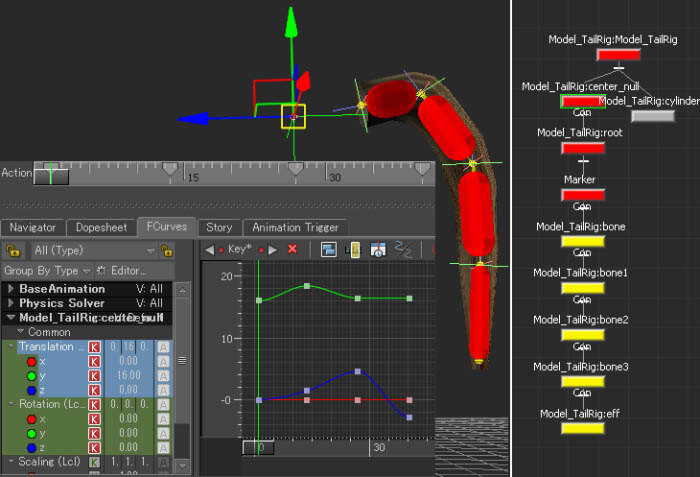 Track Content項目にView画面から動きを取りたいオブジェクトを選択して、Altキーを押しながらドラック&ドロップして登録します。 RecordModeという[ ○ ] のアイコンからRecordingOption 画面を表示させて、記憶したファイルが書き出されるディレクトリーを指定します。 Story 画面上部のRecord to Memory/Disk のボタンをクリックしてディスクに書き出すアイコンに変更します。 In Story window , create RMB > Insert > Generic Animation Track , select all objects to Plot and Drag&Drop using Alt+LMB to TrackContent . Open RecordingOption from [ ○ ](RecordMode) Button , set Path where to out put FBX file . Press [Record to Memory/Disk] to change to Disk . 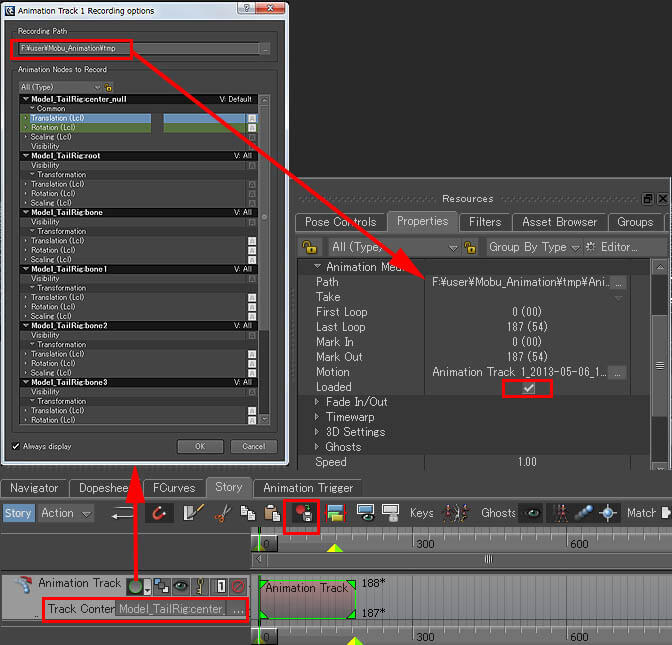 階層構造の整理と、RootなどにY軸に回転値が入っていた場合は元の0に戻します。 Importing FBX to Softimage , Scale is too big , as it has scale 10 in FCurve animation , change it to 1 . Rearrange the hierarchy , delete root Y Rotation value to 0 if any . 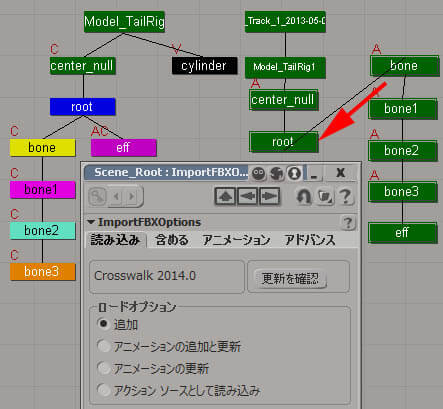 後は、アニメーションの付いているもの同士にコンストレインを設定します。親NullとEffectorにはPosition、各 boneにはPoseコンストレインを設定してみました。 First bone's Kinematic Chain settings , put FK/IK Blend to 0 . which is FK . Make Position Constraint to Null and effector , Pose Constraint to bones . 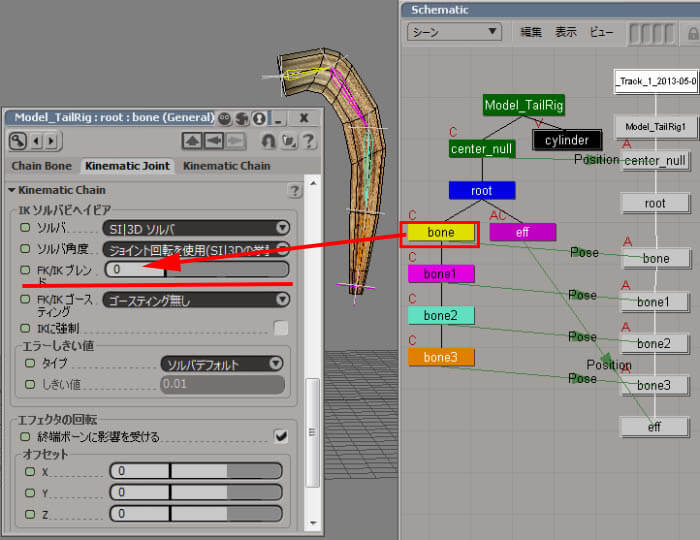 You Get same animation as in MotionBuilder . 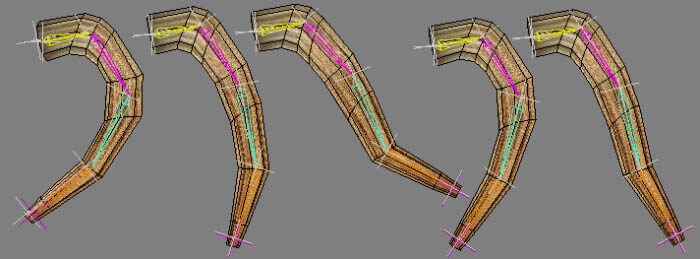 |
| という訳で、次回は... What's Next ... 乞う、ご期待!!
|