- ITソリューショントップ
-
製品・ソリューション
-
ダイキンのIT
 製造業向けITソリューション
 品質DX支援 QX digital solution
 建設業務改善ソリューション
 ビル管理業務支援 DK-CONNECT BM
 FILDER SiX TOP
 FILDER SiX 電気 TOP
 Rebro D TOP
 実験記録をデータベース化 ParsleyLab
 マテリアルサイエンス向けソフト Materials Studio
 熱力学物性予測ソフトウェア COSMO
 電子実験ノート
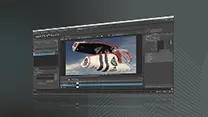 総合3DCG 制作ソフトウェア Maya
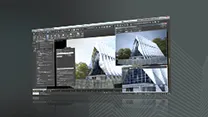 総合3DCG 制作ソフトウェア 3ds Max
 3Dキャラクタアニメーション制作ソフトウェア MotionBuilder
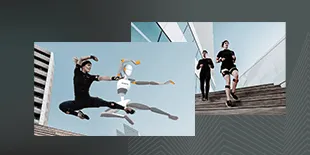 モーションキャプチャーシステム Xsens MVN
|

プロローグ;Prologue
|
| MotionBuilder って?;What's MotionBuilder ? MotionBuilder って、そのソフト内でボーンやポリゴンを作成できないの?
いえいえ、そんなことはありません。 テキスチャーやシェーダー設定、エンベロープのウェイト調整など、3Dソフトとして扱うような機能はそろっています。 (でも、やっぱ細かい事は出来ません > UV編集、ポリゴン頂点移 動、ポリゴン結合やエンベロープウェイトの付け直しや保存.. 等々) Can't MotionBuilder make Bones and Polygons? Yes it can , Texturing and Shaders, Envelope weight editing , main features about 3D software , you can . ( But can't do like UV Editing , Polygon point editing , Polygon merge, Envelope weight save or re-enveloping ....)
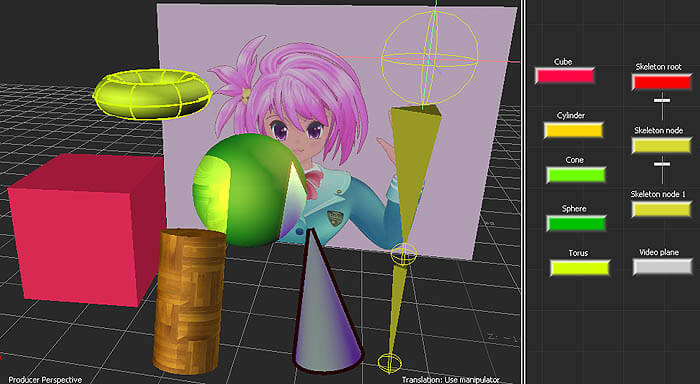 マテリアル、テキスチャー -- 反射、輪郭線、ワイヤーフレーム、AVI再生ビデオプレーン、Rootボーンとジョイントボーン Material , Texture -- Reflecting Shader , Edge Toon Shader , Wireframe Shader , AVI Video Plane , Root Bone and Joint Bone じゃー、なんで MotionBuilder だけで全ての開発を完結したワークフローにしないのか?
これもいえいえ可能です。 SDKマニュアルがあり、 Python スクリプト と C++ で 様々なツールが作成出来、これ1本で製品を作ることもできるでしょう。 So , why not use only MotionBuilder in your workflow to make a product ? You can , there are SDK manuals , Python scripting and C++ makes your tools , to finish your work . 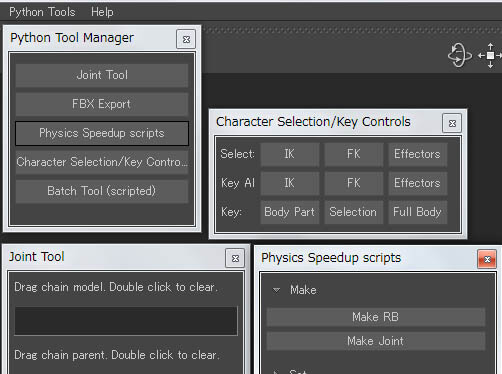 では、他のソフトとの連携がなぜ必要なのかというと・・、
それは逆に、連携が取りやすく、既存のデータや環境に MotionBuilder の得意な機能を生かせるから ということになるかと思います。 MotionBuilderの得意な機能・・・、 それは外部機器との接続が他のソフトより容易であることから様々なデバイスがつなぎやすく、 バーチャルカメラやモーションキャプチャー機器を通じて動きのデータを取得しやすい点 得た動きのデータを既存データに転送する機能が優れている点、 動きを確認するのに有利な表示速度が速い点 そして、保存形式のFBXフォーマットが、Maya/Max/Softimage との連携を取り易くしている点があげられます。 Then , why compatibility with other software is needed ? Thinking backway , MotionBuilder's compatibility with other tools are more easily made than other softwares . MotionBuilder's good features ... That is ---> Devices are easily attached , things like Virtual Camera , Motion Capture devices Data that came from these devices are easily transfered to already existing Character Rigs Performance of the viewport is very fast , good to see the motion captured animation and the saving file format is FBX , which is very good at importing & exporting with Maya/Max/Softimage . 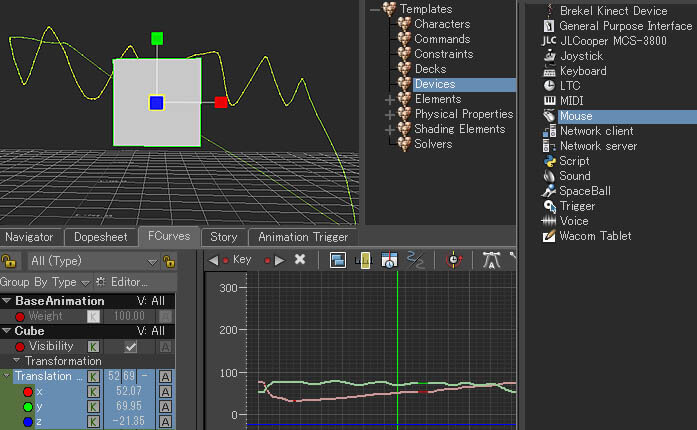 マウスをデバイス として XY軸のアニメーションを取った例 using Mouse to get X,Y animation そんなことを踏まえつつ、各種データの受け渡し、機能の紹介、ツール の紹介 などしていきましょう。 Reminding those things , I'll write about transfering 3d data, tool features , and some knowhows. |
| MotionBuilder 前情報;MotionBuilder information MotionBuilder のドキュメント等事前情報です。
Autodesk MotionBuilder ドキュメントhttp://www.autodesk.co.jp/adsk/servlet/index?siteID=1169823& amp;id=14251915&linkID=14214032 にて日本語の情報がたくさんあります。リリースノートや新機能、インストールやライセンスガイド、 そしてオンラインヘルプ、ヘルプのインストーラーとチュートリアルがあります。 MotionBuilder 2013 日本語ヘルプインストーラー motionbuilder2013_help_jap_win.exe をダウンロードしてインストールします。 インストール先は、C:\Program Files (x86)\Autodesk\Help\motionbuilder2013 って書いてあります。 About MotionBuilder Documentation. http://usa.autodesk.com/adsk/servlet/index?siteID=123112& ;id=18568083&linkID=10809896 You can find Release , What's New , Help , Installation , Tutorial There is an Online Help that you can install in your PC. 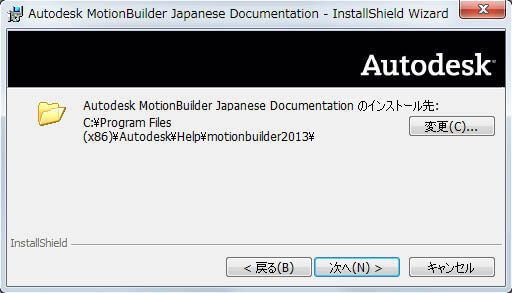 そうしたら、 MotionBuilder を起動し、 Settings > Preference で設定画面を出し、
Help 項目にて◎Local Computer/Netwo... [ Browse...] ボタンを押して、C:\Program Files (x86)\Autodesk\Help\motionbuilder2013\ja_jp を指定します。 F1 キーを押して Webブラウザーに日本語ドキュメントが開いたら成功です。Help プルダウンメニューからは色々な所に行くようです。 If you installed it , the Help can be shown using F1 key , set the Preferences > Help to Local Computer. 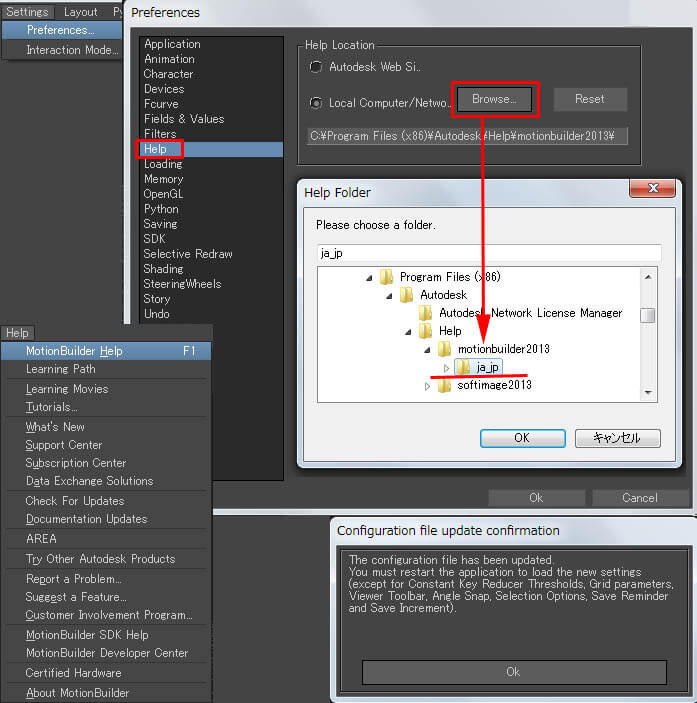 自分好みの設定に出来る範囲は結構広いのですが、厄介に感じるのは、その設定ファイルがどこに保存されているのか分り難い・・・感じです。 まずは、 キーボード設定インストールした日本語ヘルプに、Softimage キーボードショートカットなど詳しく書かれています。 インストールされた時にある設定ファイルはC:\Program Files\Autodesk\MotionBuilder 2013 (64-bit)\bin\config\Keyboard に Softimage.txt があります。 2013バージョンでまた少し良くなっています。必ずコピーを作ってから、それをカスタマイズします。 例えば、Softimage_Ritaro.txt という別ファイル名に保存し、1行目の Name を変更、208行目・209行目を変更しました。 Zキーの右マウスクリックで zoomout 機能が効かないみたいなので、Zoom に Zキーの右マウスクリックを追加しただけです。 同じキー動作を多重登録すると起動時にエラー警告が出ますので、zoomout の設定の方は無しにしておきます。 (たったこれだけでも Softimage ユーザーにとっては楽になります)
Next is about Keyboard and Layout settings .
It get's useful to customize these settings to what you like , but where these setting files are , is a little bit confusing . First Keyboard Settings , many shortcuts are written in the documentation you just downloaded . The actual setting files are inside C:\Program Files\Autodesk\MotionBuilder 2013 (64-bit)\bin\config\Keyboard Softimage settings are Softimage.txt , do a copy before customizing it . For example rename a file and than edit the first row name (ex Name = Softimage_Ritaro) Since I found my Z - RMB doesn't work with camera zoomout , I put it in camera.zoom 保存先なんですが、ユーザー個別の設定ファイルなので、C:\Users\ritaro (ユーザー名)\Documents\MB\2013-x64\config\Keyboard の中に保存します。 Windows7 だとやたら分り難くくユーザー > ユーザー名(Ritaro) > マイドキュメント > MB > 2013-x64 > config > Keyboard の中のことです。 ここにはMotionBuilderの他の設定ファイルも保存することに利用します。 After text editing , save the file inside users folder , which is
C:\Users\ritaro ( username )\Documents\MB\2013-x64\config\Keyboard Use this config directory to save other custom settings . 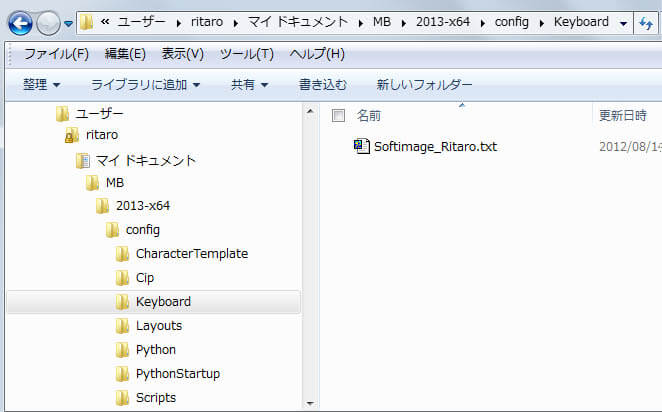 MotionBuilder を起動し、Settings > Interaction Mode ... から表示されるプルダウンメニューで保存したファイルを設定できたら完了です。
MotionBuilder のキーボードマッピングにはスクリプトの動作もキー登録出来るなど、他にも色々とカスタマイズが出来ますので、調べて応用してみてください。 Inside Settings > Interaction you will find the New Keyboard Settings from the pulldown menu . MotionBuilder's Keyboard mapping also allows you to set some scripts on Key , find some useful setting in Documentation. 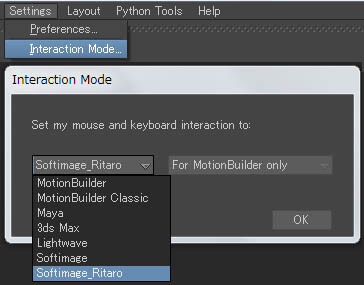 画面をいじるとどんどん変わっていってしまいますが、Layout > Editing にすれば元に戻ります。 CreateCustom..からユーザー独自のものを作れます。 □ Auto-UpdateLayout のチェックは外しておいた方が変にしてしまった時に保存されないで済みます。 ユーザーが作成した Layout は先程の場所C:\Users\ritaro (ユーザー名) \Documents\MB\2013-x64\config\Layoutの中に置きます。
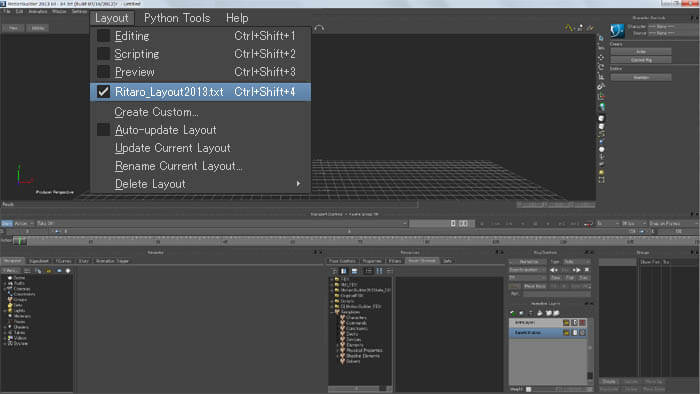 最近はワイドのモニターなので、横長に設定しても大丈夫です。
例えば、 Ritaro_Layout2013.txt という別ファイル名に保存し、10行目の Name を変更し、 Wnd_3 内にあったGroups項目を Wnd_2内に記述しました。使うと便利な Group をタブ内ではなく、表に出したレイ アウトにしてみました。 Group はそのグループ内に登録したオブジェクトを一括で表示/非表示・選択/非選択・移動/非移動 (Show・Pick・Trs ) にできる画面です。 この例では、デフォルトの時とは違うウィンドーの下に Group が設定されます。 And this is about Layout settings . Also see some information in the HELP. You can make a new one though Layout > Create Custom... Check out the Auto-UpdateLayout , because it might save an unexpected Layout when editing. Then save your custom layout file under C:\Users\ritaro ( username ) \Documents\MB\2013-x64\config\Layout Nowadays , PC monitors are all wide , so I putthe Group window out to right-low part . Group feature is very useful when you have many objects in the viewport , can select Show/Pick/Trs . Male a copy before editing Layout file , then rename the Line Name= (ex , Name = Ritaro_Layout2013.txt) Sample beneath is putting Group into Wnd_2 as a Tab.
Softimage 操作でも少し異なりますが、多少の慣れで操作は問題な くなると思います。
FBXファイルの View画面へのドラッグ&ドロップ対応、 Ctrl+2 で2画面分割、 9キーでスケマティックビュー、F キーで全オブジェクトの画面視化、 Ctrl+N で新規シーンなど。 Interaction is slightly different form Softimage , but can used to it. You can Drag&Drop FBX file from Windows Explorer , Ctrl+2 will split Viewport to two , 9 key goes to schematic view and F key to show all , Ctrl+N to make new scene . 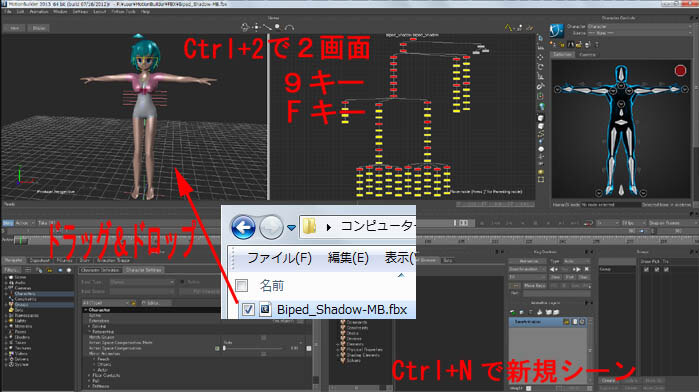 MotionBuilder はグラフィックスカードのPhysX 機能を利用してシミュレーションを行うことが出来ます。 About PhysX , MotionBuilder simulates with most NVidia graphic boards .  NVIDIAコントロールパネルから PhysX構成の設定で PhysX プロセッサーでグラフィックボードを選択します。 Get NVIDIA PhysX System Software installed from The NVIDIA Home page , then chose your graphicboard to do PhysX in the NVIDIA control panel . 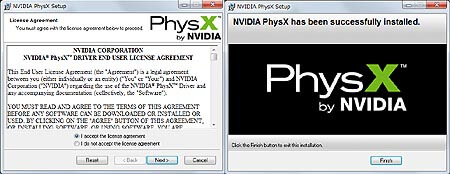 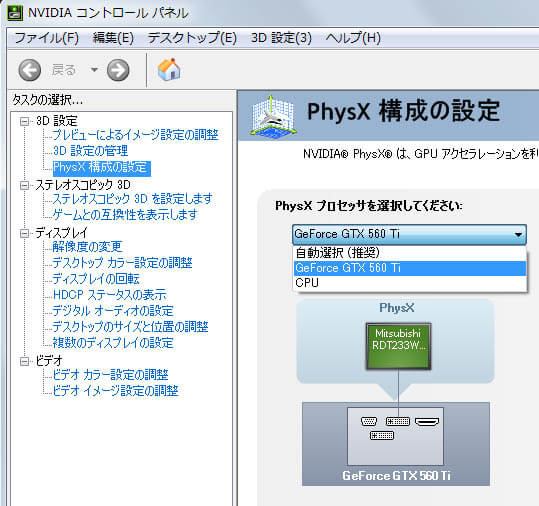 |
| MotionBuilder用データ作成;Making Data for MotionBuilder Softimageにはかなり以前から自分のキャラクターの体形 に合わせてRigを作成できるツール;二足ガイド(BipedGuide)があります。 更に、このツールには Biped Rigと同時に骨だけで作成される Shadow Rig も作成してくれる機能があります。 今回、ここで使うデータは、この Shadow Rig を使用してみようと思います。 MotionBuilder と Softimage 間に使うデータにします。 Softimage has a tool that can make a custom rig for your own character , called Biped Guide . This tool also makes a bone only rig which is named Shadow Rig. Here I will use this Shadow Rig to translate data between the two software. 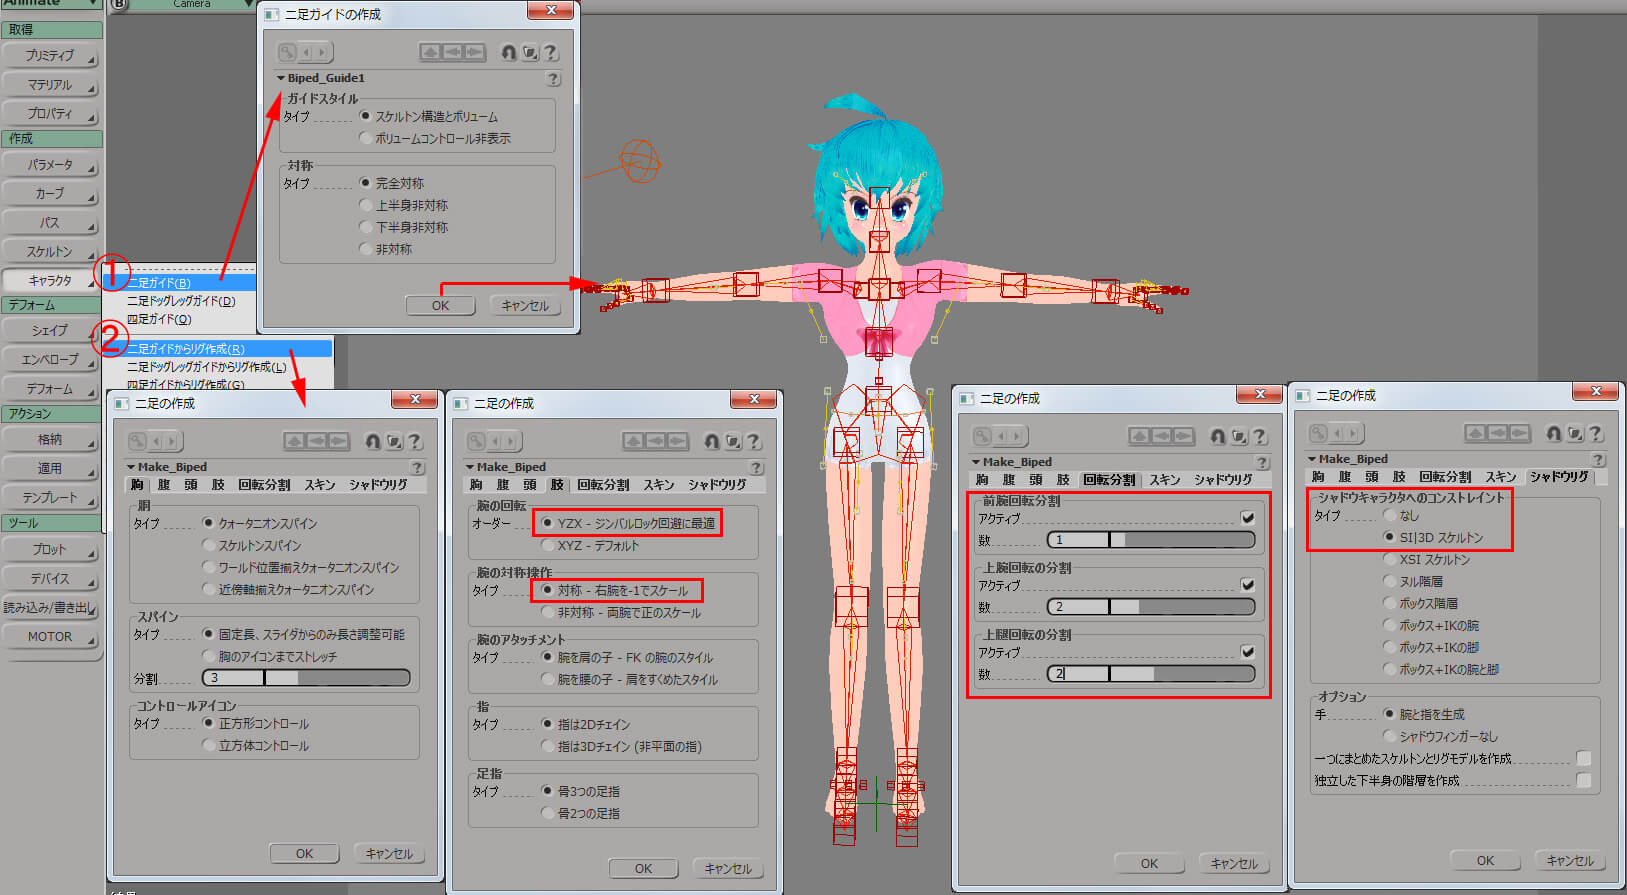 作成する時気をつける点があります。 腕の回転 ◎YZX - ジンバルロックの回避に最適 > 肩の回転順番がYZX に指定しますが、FBX で MotionBuilder から Softimage にデータが帰って来た時継承されるようになりました。 腕の対象操作 ◎対称 - 右腕を - 1でスケール > 右腕にマイナスのスケール値が入って来ます。このマイナス値は出来上がる Rig の RShoulderRoot につきますが、 同時に作成される シャドーリグの方には マイナス値が付 きませんので、このままの設定でシャドーリグを作成します。 データ転送時にこのマイナスは対応できるのと、このままの方が出来上がるRigには都合が良いようです。 回転分割前腕回転分割1、上腕回転分割2、上腿回転分割 2、 > 出来たRigの中間骨の数ですが、MotionBuilder で設定できる数は 2 までです。今回のデータ転送には中間骨を考えていません。 シャドーリグタイプ ◎SI | 3D スケルトン > このデータを MotionBuilder に持って行きます。 The Red Rig used to fit your character , than do Character > Rig from Biped Guide . When making a Rig , there are few things to care . ◎YZX - Best for gimbal lock reduction , > The FBX from MotionBuilder now supports this Rotation order to Softimage. ◎Symmetical - Right Arm Scaled -1 > The Right Arm has -1 scale to Rig's RShoulderRoot , but the Shadow Rig doesn't have -1 . When getting back the animation to Biped Rig , this -1 must be reminded. ◎Roll Subdivision to ForeArm , Bicep , Thigh > In MotionBuilder there are only 2 to subdivide , but this time , I will not divide in Shadow Rig . Most important , Make a Shadow Rig in ◎SI | 3D Skeleton . This data is used to transfer to MotionBuilder . すると、 Biped と Biped_Shadow という2つのModelが作成されます。この間の骨の値はなるべく同一の方が扱いやすいはずです。 この2つは関連性が付いていますので、 Biped を動かすとBiped_Shadowが動く状態です。今は、このリンクを全て削除しています。 削除は簡単で、2つの階層構造間をスケマティックビューで間を開け、緑色の関連を全て選択して Deleteキー で削除できます。 しかし、このままでは、後々問題になって来る点がいくつかありますので 、ご紹介します。 In the result , you get two rigs , Biped and Biped Shadow as a Model Data . There are relationship between them , which aren't needed , delete them . But not quite finished yet , some more customize is needed . 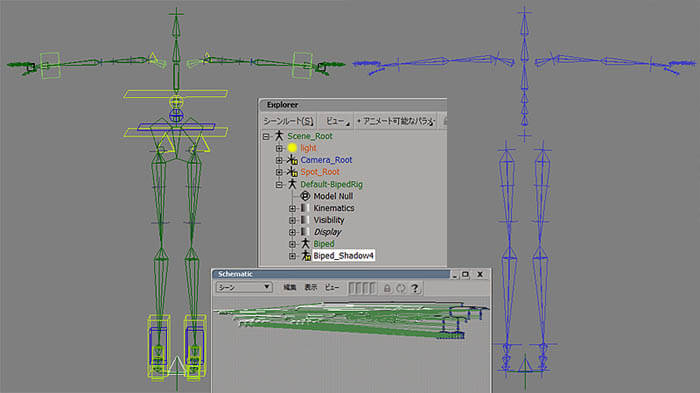 そこでバイプド・シャドーの骨を捨て、代わりにNullを使って軸方向を合わせました。 ここは MotionBuilder からデータが Softimage に帰って来た時にオフセット値が必要になるところです。 Looking inside , note that ChestBone is a Curve that does not get equal to SRT Bones . So , had to replace to Null Bone , remember to set an offset to Rotation data when the animation comes back to Softimage . 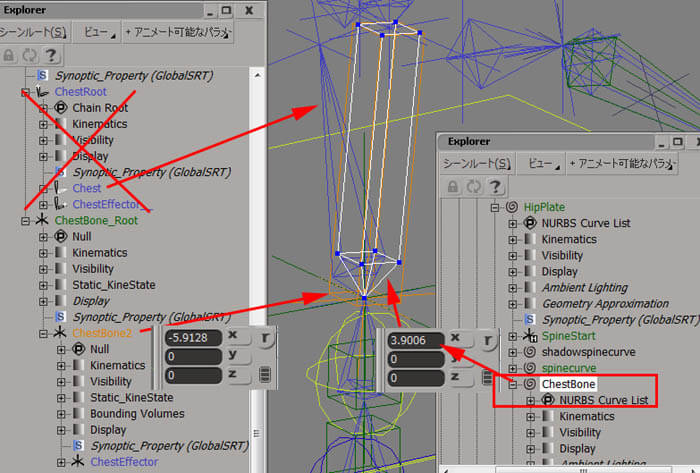 ここも、インプレシットのボーンを用意して Rig と同じ回転値になるように設定しています。 Biped Shadow 's Neck Rotation has different from Biped Neck . So , I made a implicit bone to mach . 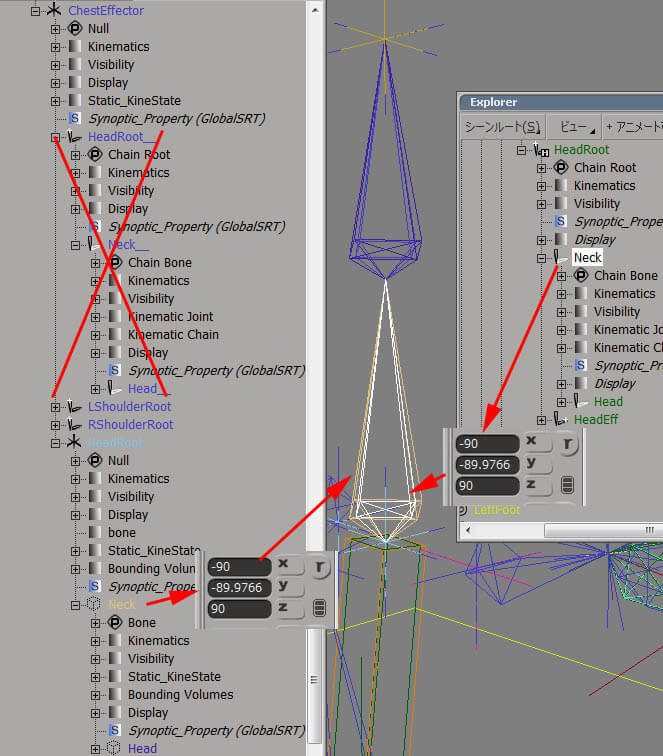 Looking carefully , to have close data between Bones of Biped and Biped Shadow. 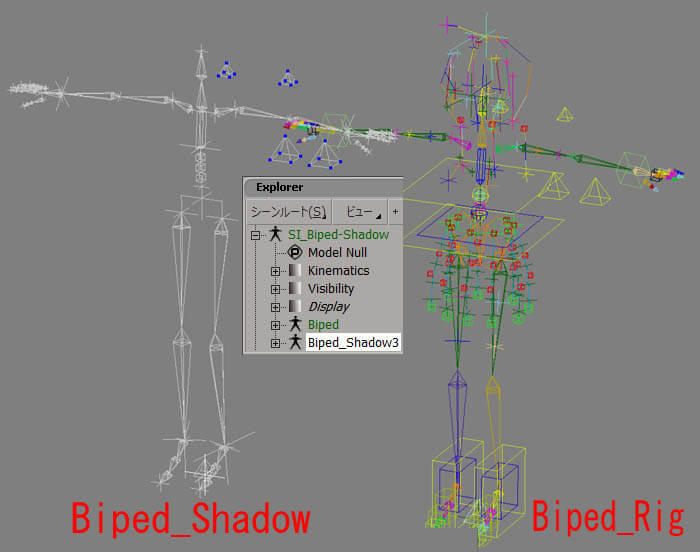 後は、 MotionBuilder 側では要らないものを削除します。
三角錐のUpVectorの削除、HipPlate,LElbow、RElbowの削除などをして、なるべく直線で終わる階層構造にします。 (削除するオブジェクトにウェイトが付いている場合は、ウェイトの再調整が必要です ) Delete objects that won't use it in MotionBuilder . UpVectors , HipPlate , LElbow , RElbow , and put them in straight line . ( If envelope weight in on these object , you have to re envelope) 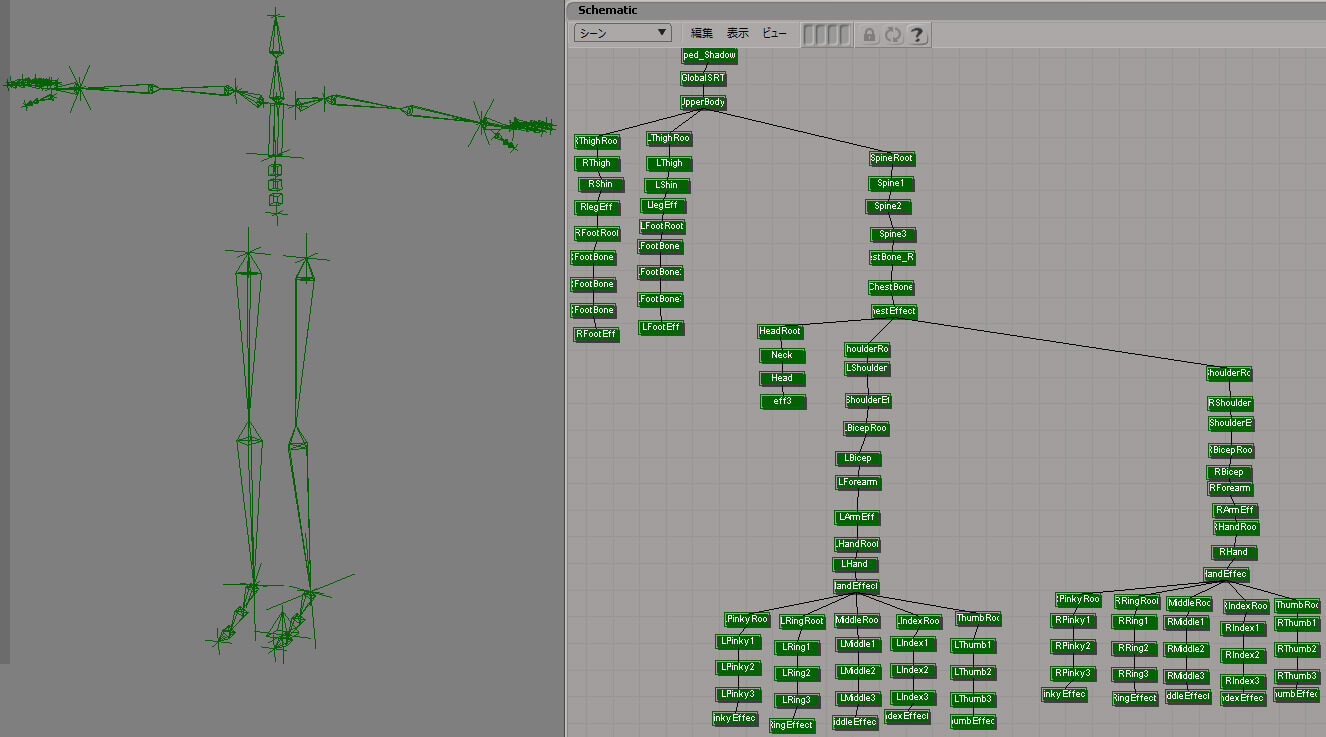 作成した Biped_Shadow Modelデータ(Softimage 2013 SP1)>> Biped_Shadow3.zip A Bone Model Data of Customized Biped Shadow (Softimage 2013 SP1) 右のリグにはレンダリング用のキャラクターモデルがエンベロープ化されている、という例です。 Putting polygon envelope to this customized Biped Shadow , you can bring it with the rig to MotionBuilder .  Output this Customized Biped Shadow using Crosswalk to FBX file format . 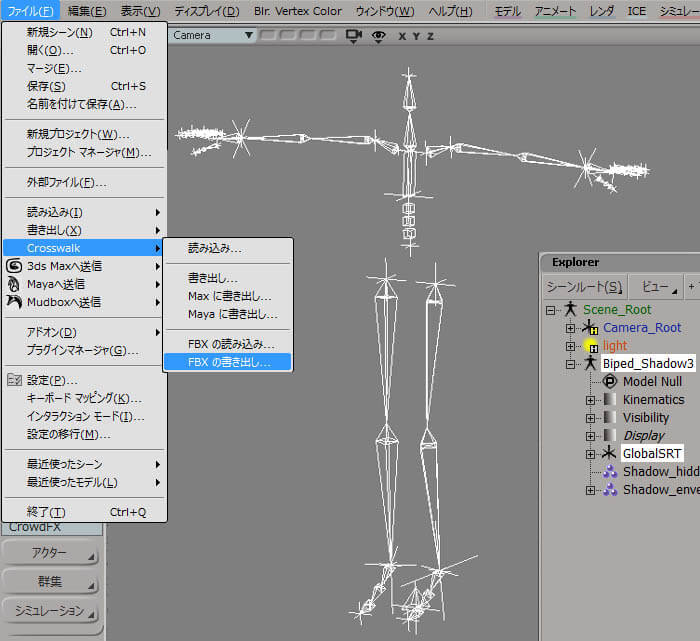 出力設定は、ほぼそのままで、選択のみ での出力と、カメラやライトは要りません。
Exporting Options are almost default , just Selection Only , and no Camera and Lights . 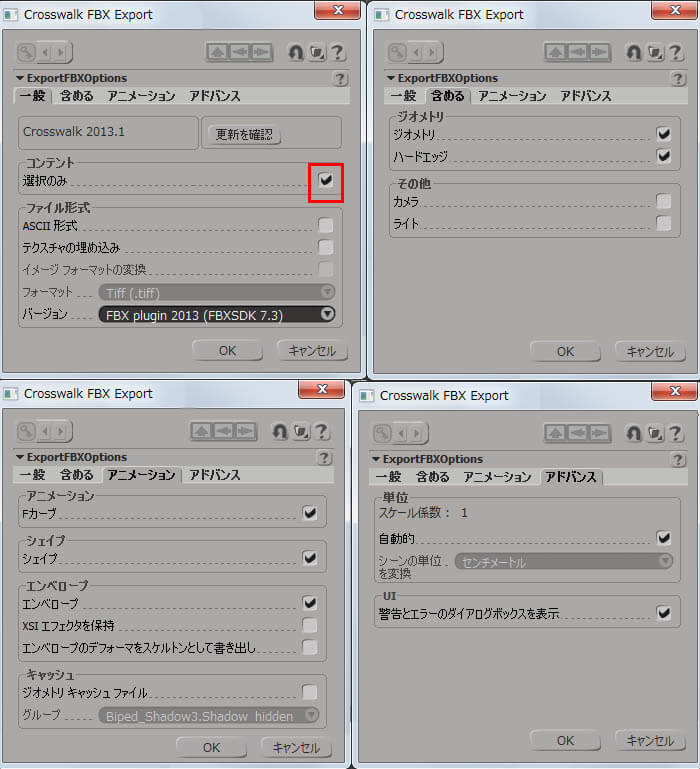 Asset Browser からFBX形式で出力したディレクトリーを画面上を 右クリック >Add favorite path から選択すると、右側にFBXファイルの名前一覧が表示されます。 At last MotionBuilder , add your directory where you exported the FBX using Add favorite path in Asset Browser. 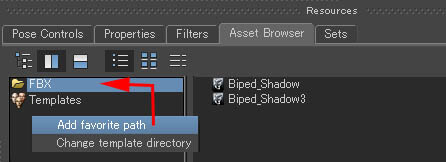 スケールが小さいので一番上のBiped_Shadow3選択した状態で スケール値を10倍にするとちょうど良い感じの大 きさになります。 Import the FBX file by Drag&Drop form Asset Browser , and scale it up to 10 , so that you can see more likely in the viewport . 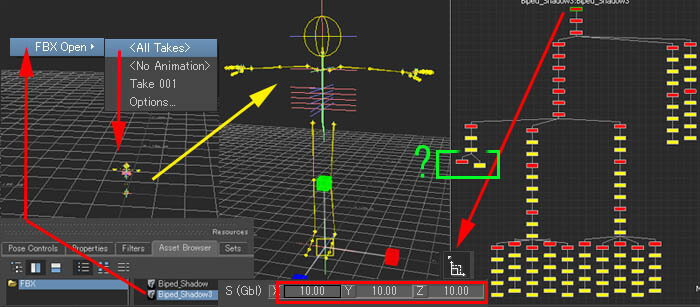 ここまでのデータを保存しておきましょう。 I found 2 heads , so delete the red one , but rename the rest to "eff3" .  作成した Biped_Shadow FBXデータ(MotionBuilder2013)>>Biped_Shadow3-MB.zip MotionBuilder FBX data of Customized Biped Shadow (MotionBuilder 2013) MotionBuilder の 自動更新機能 ;MotionBuilder's automatic update MotionBuilder で Softimageから出力したFBXを開いている場合、SoftimageのシーンからFBXを上書き保存すると、 MotionBuilderの方が反応して更新するか聞いてきます。データの作成時に便利な機能です。 If you are seeing the FBX file in MotionBuilder , and do a re-exporting in Softimage , MotionBuilder notes you to reload or not , automatically . This feature is useful when you are making a new rig data . 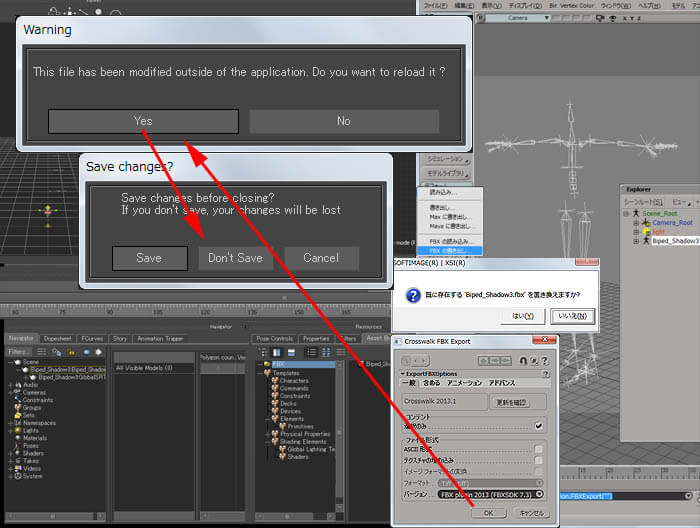 |
| データのリファイン;Data refining Softimage から来た骨構造データを MotionBuilder 上でより良いデータに仕上げてしまうことも可能です。 MotionBuilder での操作に慣れてくると、操作は意外に楽です。 今回用意した Biped_Shadow3 というデータはこのままでも使えます。 MotionBuilder 上での表示と扱いをより良くしたいと思う場合は、以下を参考にしてみてください。 例えば、背骨の部分は Null が続いている状態なので、骨にし てみたいとしましょう。 AssetBrowser で Templates > Elements > Primitive から Skeleton root をスケマティックビューに取り出します。 選択した状態でAlt+左マウスボタンでドラックして、置きたいオブジェクト上にドロップするとメニューが表示されるので、 Align > All を選択すると、SRT全部を一致させてくれます。 Size がでかいので 10 くらいにしておきます。 Skeleton node も同様です。慣れるとあっという間です。 Refining data from Softinage in MotionBuilder is quite easy . The Customized Shadow Rig can be used as is , but if you want more to be likely data , you can go as follows . For example , the Spine bones are all Nulls , you can fix it as Roots and Nodes. From Asset Browser , find Skeleton root or node and Drag & Drop to schematic window . Select what you Dropped , and with ALT+LMB , Drag upon where you want it to be , pop up menu will appear , select Align > All . 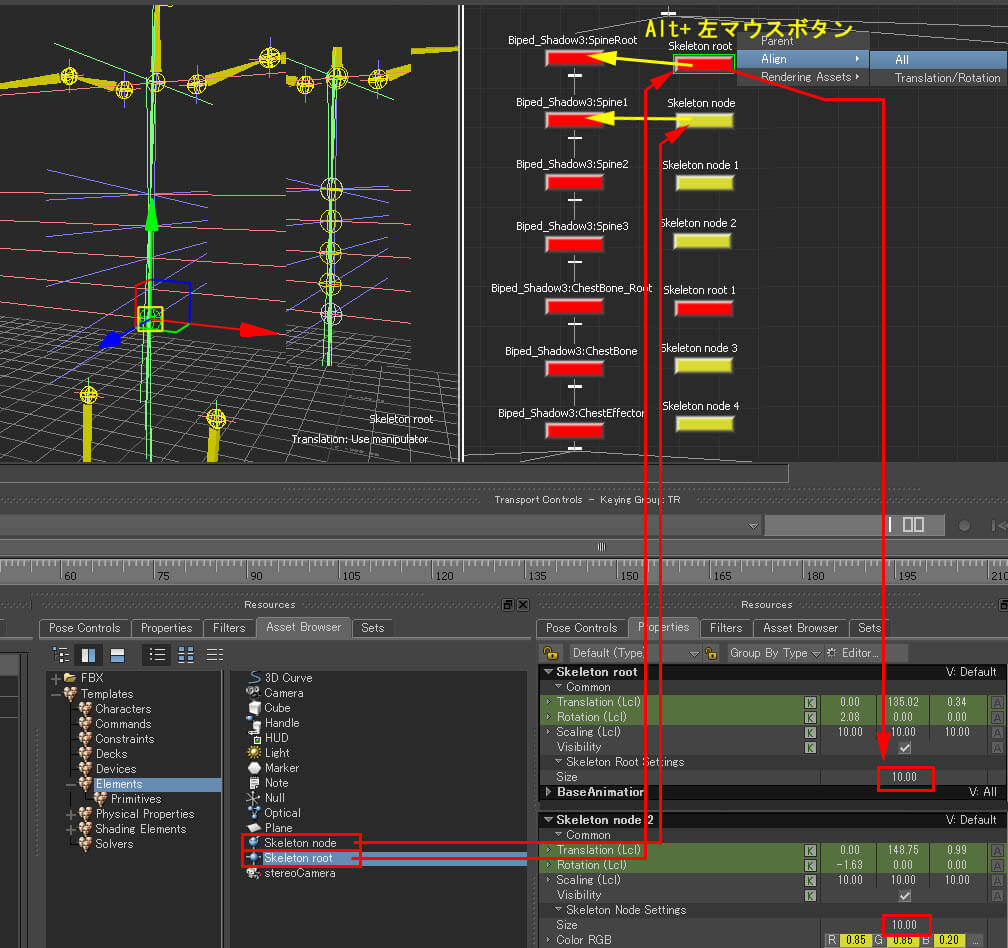 選択したものが子供、ドラッグした先が 親 になります。これで階層を作ると、左側のView画面が骨表示になります。 Next is select one that you want be a child , with ALT+LMB , Drag upon what you want be a parent , pop up menu will appear , select Parent . 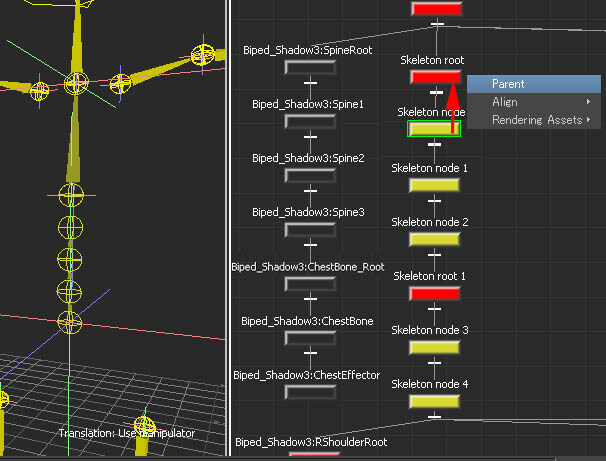 Softimageで言うところの Model名 にあたるところの Namespace が付いているので、オブジェクト名は同じくできます。 選択したものを右クリックして表示されるメニューから Rename を選択して 名前を コピー ペースト します。 (コピー元の階層が黒いのは非表示(Hキー)にしてあるからです) Rename the Roots and Nodes to same as should be . 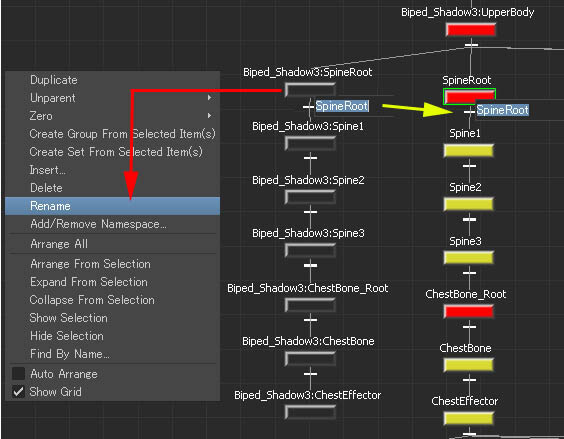 から表示された画面で使用するネームスペースを選択状態にして [ OK] を押すとネームスペースが追加されます。置き換えや削除も出来ます。 ネームスペースは Softimage にデータを持って帰った時の Model名 になるので重要です。 Delete the original , and put back the Namespace on it (Model Name in Softimage ) , using with selected , RMB > Add/Remove Namespace... 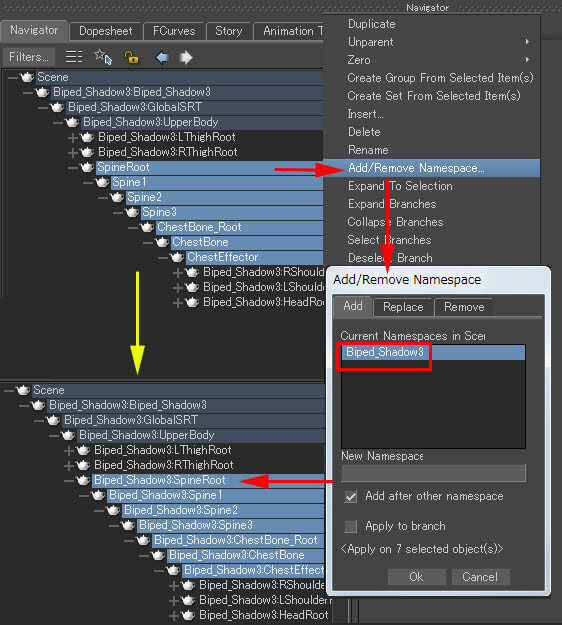 MotionBuilder の FBX として保存しておきます。 Then , you get nice Spine bones .  作成した Biped_Shadow FBXデータ (MotionBuilder2013) >> Biped_Shadow3-MB2.zip MotionBuilder fixed FBX data of Customized Biped Shadow (MotionBuilder 2013) で、この MotionBuilder 画面上できちんと骨表示になるようにアスキー形式のFBXをテキスト編集したらできないかな?って思ったら出来てしましました。
Objects:という項目のNullが続いている上から11個がキャラの背骨なので、 RootとLimNode部分コピペしてしまえば、あとは読み込んでくれました。 記述が増えている部分は、表示時のサイズや色が書いてあるだけです!!ナンクルナイサー!! With more investigation , how about editing Ascii FBX , found where Objects: are written , changing Nulls to Root or LimbNode with color and size will change to MotionBuilder skeletons . Piece of pie.
すると、 Softimage からエンベロープ付きのデータが最初にはこんな感じだったのが、 So , the data from Softimage was first like this. 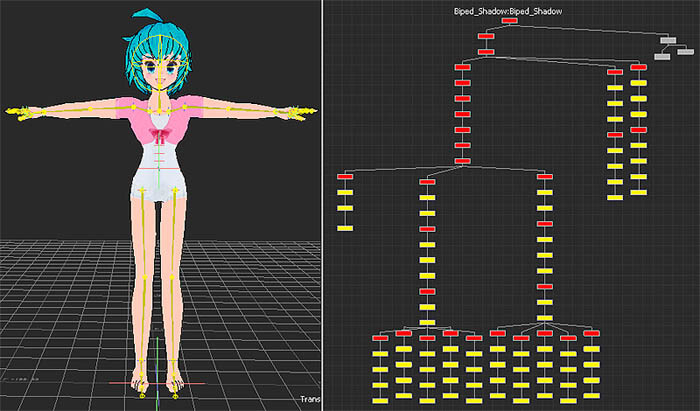 ↓ 下の図では骨表示になっています。
After text editing , the spine got like this ↓
マテリアルのEmissive を 1、Specularity を 0 にして、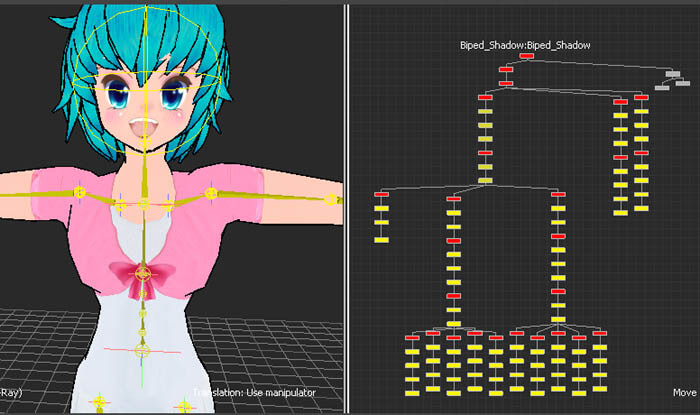 Shaders > Edge Cartoon をドラッグ&ドロップしてAppend を選択するとToonのような表現になります。 Changing Material to look more like a toon character ,
Emissive to 1 , Specularity to 0 , and Drag&Drop to polygon Shader>Edge Cartoon and select Append form a popup menu . 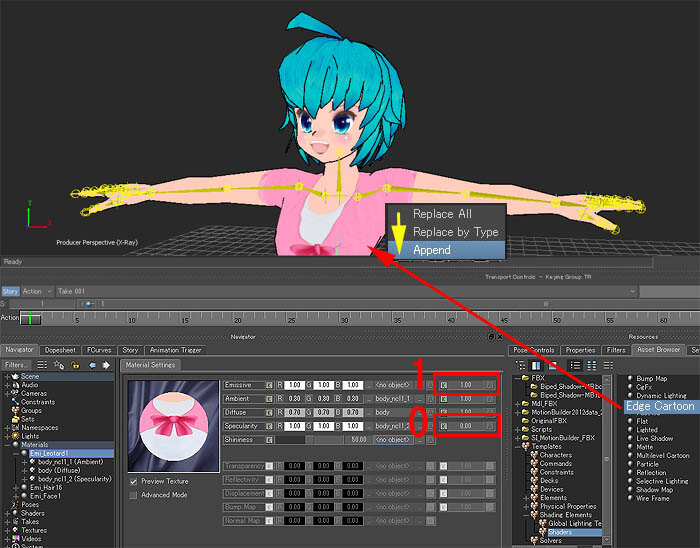 MotionBuilder のウェイト値編集;MotionBuilder Envelope Weight Editing MotionBuilder上でもウェイト値の修正は可能です。 ( ただし、ウェイト値単独の保存や読み込みなど細かい作業はSoftimage側で 行いましょう。) View画面右側にあるモード選択アイコンで、VertexMode にしておきます。Window > Skinsからウェイト編集画面である Skins を表示します。 Skins表示画面内の右側■Automatic Bone Selection と■ Foreground Vertices Selection にチェックを入れて有効にしておきます。 編集したい頂点を選択状態にすると、その頂点についている Weight値 情報などが表示されます。 Envelope Weight Editing is possible in MotionBuilder . ( But saving it , or reloading it , and other more thing is better done in Softimage )
Change to Vertex Mode using an ICON in right menu of viewport , get Skins Window form Window > Skins . Put on ■Automatic Bone Selection と■ Foreground Vertices Selection , in right side menu . Select the point to edit , a color and sliders will appear with Weight % .  |
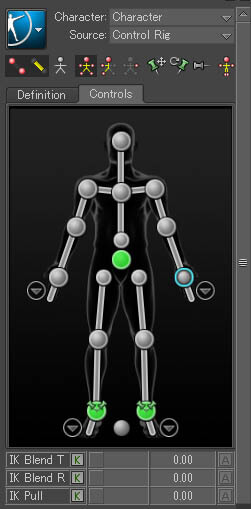
| キャラクタライズ;Characterize Softimageから来た骨構造データを MotionBuilderが扱う ControlRig と関連性を作ります。そのことをキャラクタライズと言います。 キャラクタライズすることでフルボディーIKリグ で骨構造を動かせるようになるだけではなく、 モーションキャプチャーしたデータや既存アニメーションデータを乗せ変 えて Story と呼ばれる機能を使ってアニメーションの編集を可能にしたり、 リジットボディーダイナミクスやラグドールといった物理計算の動きの追加するなどができるようになります。 では、まずはControlRigの作成からです。 右上の Skeleton ボタンを押して、Define から ControlRig を作成します。 上欄Character に名前Character になっています。 Making a Control Rig with data from Softimage , is called Characterizing .
Control Rig will let your Rig animate in Full Body IK . Also transform motion capture data to your Rig , create new animation using Story , attach RBD , or RagDoll that will simulate movements . In Character Controls Menu , Click [ Skeleton ] button , and select [ Define ] . In the top Character: is named Character .  逆三角形アイコンはより細かい各部の設定絵に切り替わります。その中 も必要な分だけ設定していきます。 Matching bones as follows , select a bone and pick where it is in human picture ,
RMB > Assign Selected Bone , will make the assigned point green . There are more to assign inside the triangle ICON . 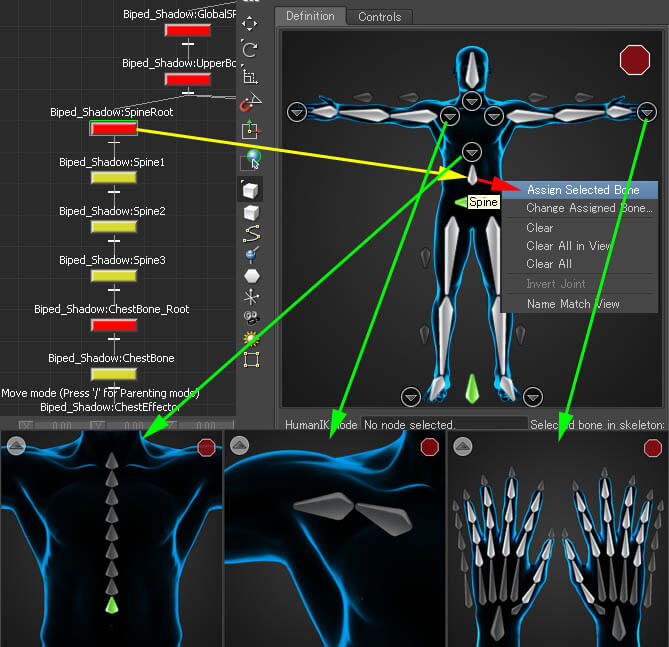 そのテンプレートを読み込めば、あっという間に終了です。 骨構造体を選択状態にしておき、青色アイコンからEdit > Definition > Load Skeleton Definition..を実行し、 表示される画面でテンプレートのファイルを指定してOKを押しま す。 一部黄色が残っていますが、これは骨が水平でない時になります。だいたいがあってればアニメーションはOKのようです。 Looks like a bit terrible , but if your using the same rig , then you can re-use the saved settings as a template .
If you have a template , you just have to Load it . Go Edit > Definition > Load Skeleton Definition... select template you have and click [ OK ] . 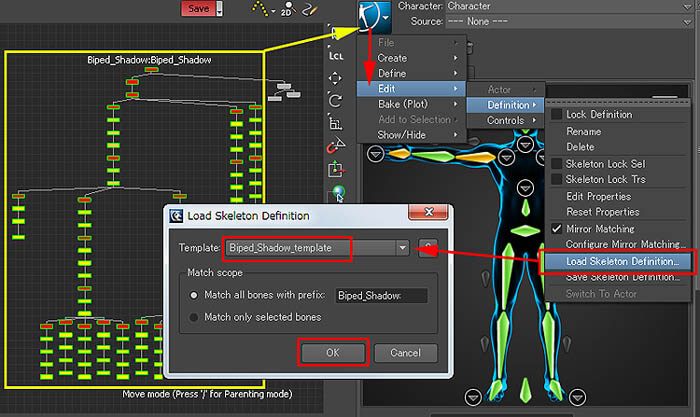 C:\Users\ritaro(ユーザー名)\AppData\Roaming\Autod esk\HIKCharacterizationTool4\template内にBiped_Shadow_template.xmlがあります。 Windows7 だとやたら分り難くくユーザー > ユーザー名(Ritaro) > AppData > Roaming > Autodesk > HIKCharacterizationTool4 > templateの中のことです。 このファイルも極めて単純なxmlファイルなので、テキスト編集しても作れるようなデータです。 But , again , this template is somewhere you can't find easily ... You can find a saved template in C:\Users\ritaro( username )\AppData\Roaming\Autodesk\HIKCharacterizationTool4\template which file is written in XML file , is also you can edit . ここに提供しますHere is a one I made >> Biped_Shadow_template.zip  表示される Character 画面で Biped (二足歩行)のボタンを押し。次に表示されるCreate Control Rig 画面で FK/IK ボタンを押します。 If done , select Souce: in the top menu as Control Rig , select [ Biped ] , select [ FK/IK ] . 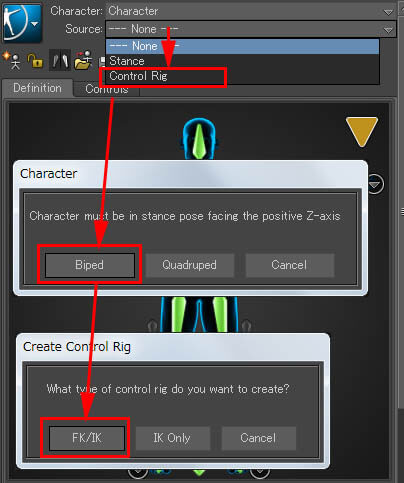 Control Tab will be made and Control Rig is made inside your character . Character_Ctrl in Schematic View . 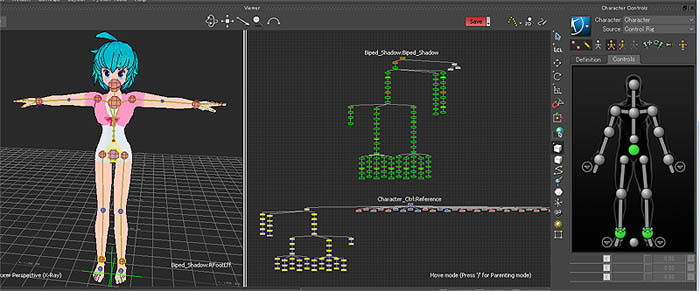 体全体が引っ張られます。これが フルボディーIK が動いている状態になります。 Select Full Body ICON and grab a hand and pull down , then the whole character will move like this . This is what Full Body IK is working , very useful to do character animation . 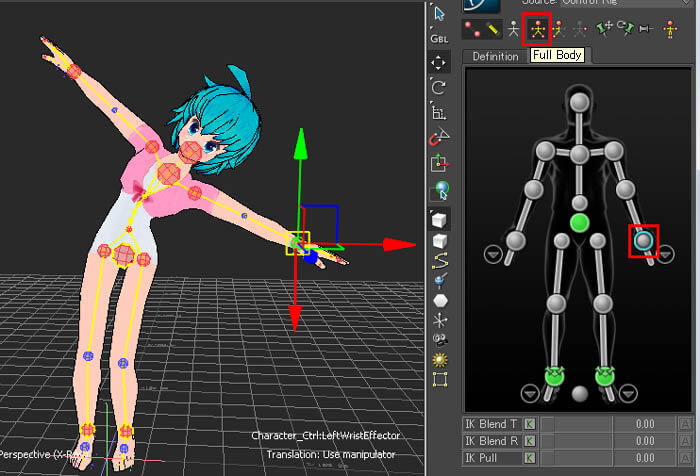 Save this scene as a basic start scene . |
| Actorモーションの適用;Applying Actor Motion キャラクタライズまで来たら、何か動かしたいですよね。モーションキャプチャーした元データから説明すると Actor に動きを乗せる作業からはじめないといけないので ここでは一旦、Actor に動きが乗せてあるデータから話をすすめましょう。 以前にモーションを撮ったデータを使います。参照 >> キャラクター・メイキングモーションキャプチャー その1 As we have a character that has characterized , I think you want to move it . But if start writing about source motion capture data , you'll have to setup the Actor in MotionBuilder . Let's go on from a data that is already set uped Actor data. This motion capture data was taken before . See Here (Sorry Japanese only )
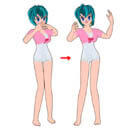
このデータを MotionBuilder に読み込むと、Actor にモーションキャプチャーのデータが乗っていて、両手を広げるアニメーションになっています。 Import this data to MotionBuilder , you can see the Actor moving it's hand wide opening . 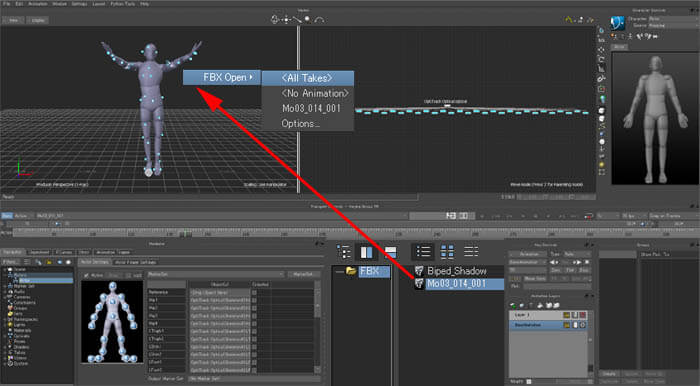 左下の Actor欄で、例えば Hip には 4頂点からなる動きだ...と設定しています。 The Actor is set with the Motion Capture Data in Actor Setting menu , for example , Hip has it's movement from 4 points . 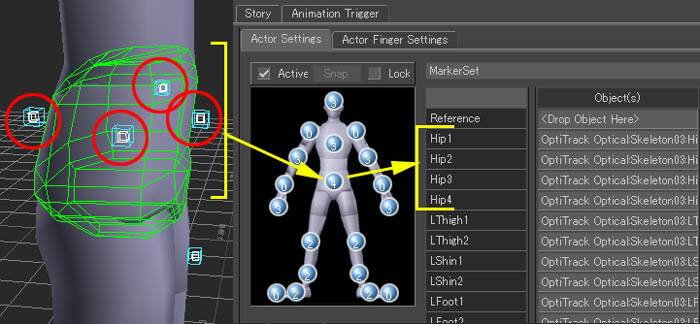 そして、Character の InputType を Actor に変更します。 すると、どうでしょう!!あっという間にキャラが動いてしまいます。 First , load the scene of Characterized , then FBX Merge the Actor scene . Change the Character's Input Type from Control Rig to Actor , and you'll see it move with the Actor !! 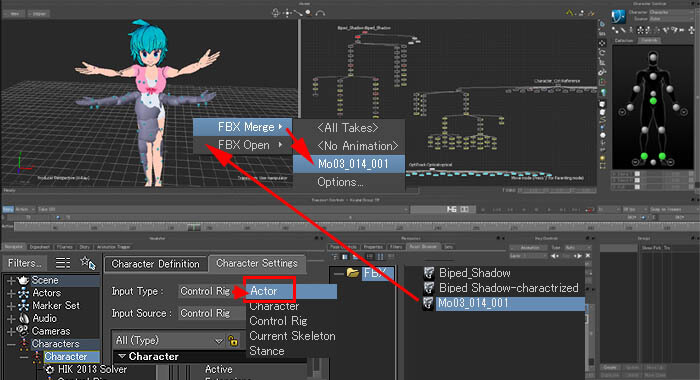 More things to write , but enough for a page ... |
| SoftimageRigへの結果 ; Result in Softimage 先にどうなるかを紹介しておきます。 ICE を使って作ったリターゲットシステムにより、Softimage上で作成されたIKのRigにちゃんと動きが伝わります。 FBXの読み込みも、Mixerのクリップとして読み込めるので、 キャラクターの Mixer にドラッグ&ドロップすることでキャラクター の動きになりました。 Showing the result in Softimage first, used ICE to Retarget data to IK-Biped Rig . FBX can be imported as a Mixer Source Clip in 2013, which you can Drag&Drop to your Character's Mixer.  あとは、動きの調整なんかも必要ですので、もう少しブラシアップしてみ ます。 Animation in MotionBuilder has to be have more fixing ... |
| という訳で、次回も MotionBuilder 続きます。Next will be MotionBuilder Again... 乞う、ご期待!! Stay tuned ..
|